
Garden Basics with Farmer Fred
Tips for beginning and experienced gardeners. New episodes arrive every Friday. Fred Hoffman has been a U.C. Certified Master Gardener since 1982 and writes a weekly garden column for the Lodi News-Sentinel in Lodi, CA. A four-decade fixture in Sacramento radio, he hosted three radio shows for Northern California gardeners and farmers: The KFBK Garden Show, Get Growing with Farmer Fred, and the KSTE Farm Hour. Episode Website: https://gardenbasics.net
Garden Basics with Farmer Fred
203 Plant Tomatoes in June? YES!
Use Left/Right to seek, Home/End to jump to start or end. Hold shift to jump forward or backward.
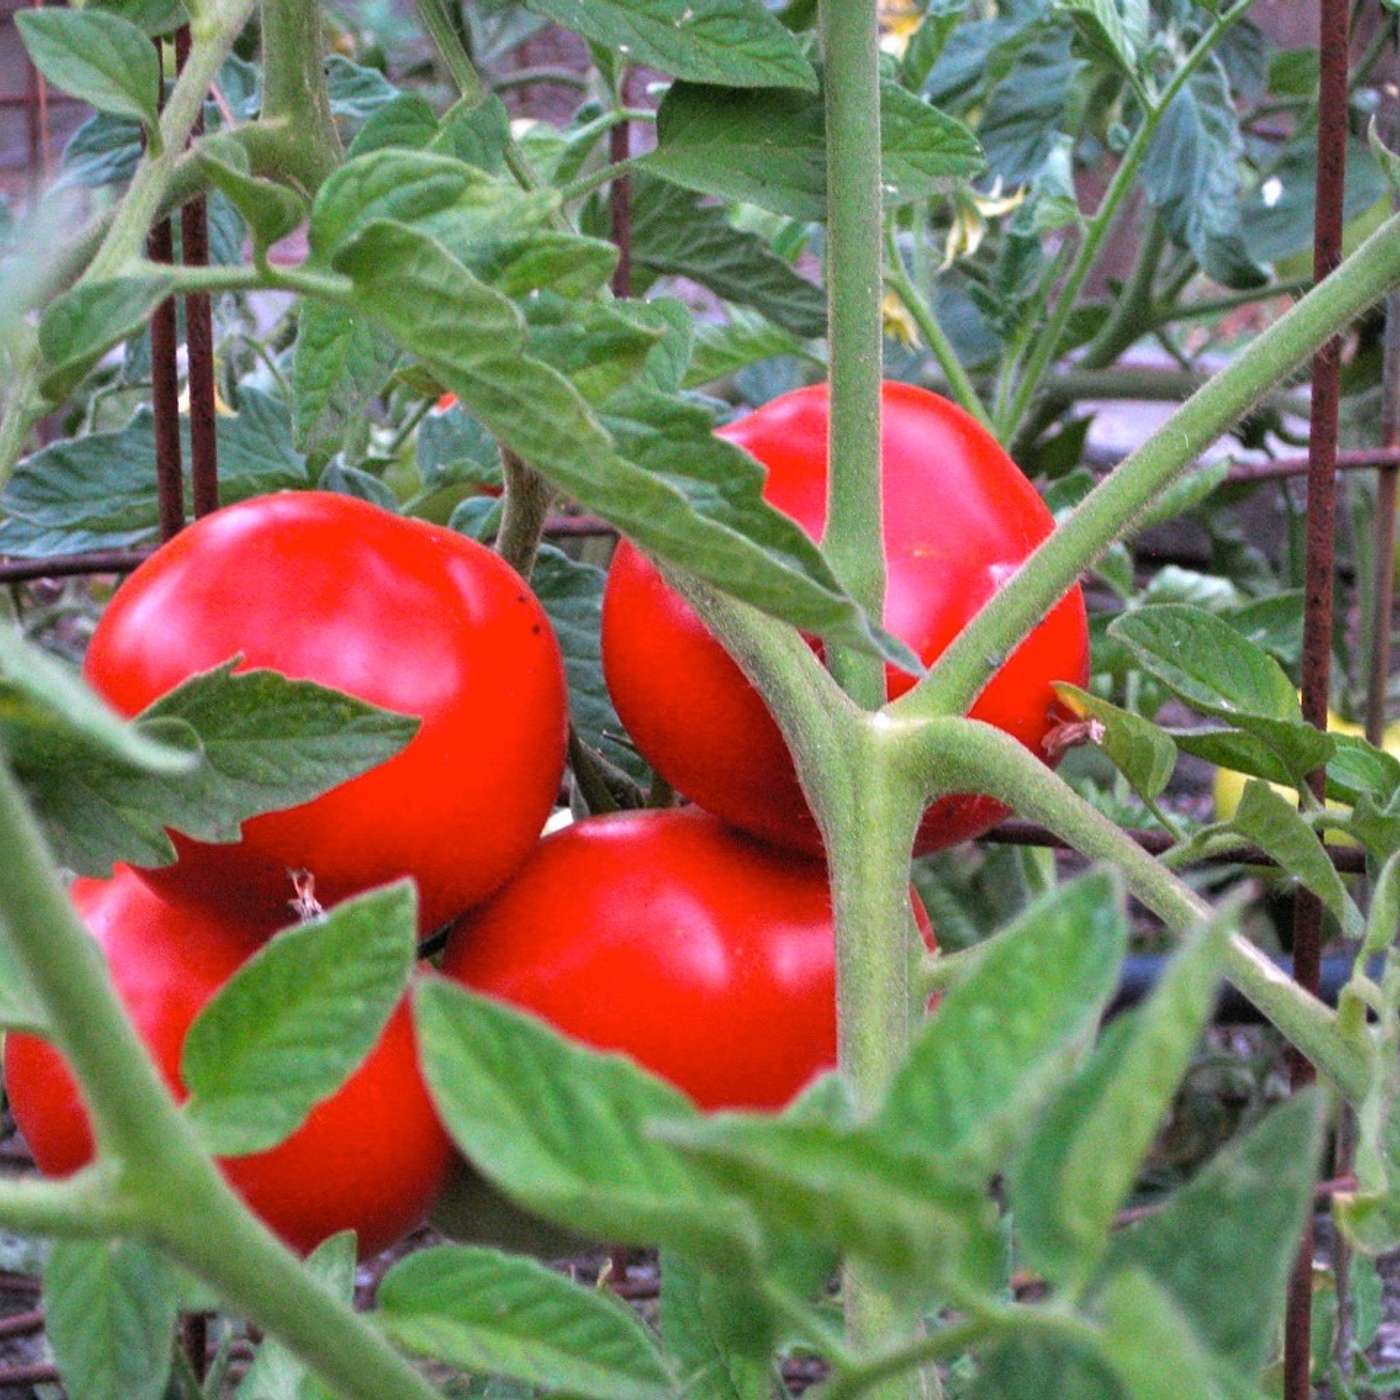
Right now, in Mid-June, is still an excellent time to be planting tomatoes from transplants. It’s not too late, even for those of you in colder climates where frosts may occur in September. You just have to choose your tomato varieties a bit more carefully. We have the ones that will work for you, as well as tomato varieties for June planting for everyone in warmer climates.
What can you do with the shards from a broken pot? Lining the bottom of another container, perhaps?Not a good idea. Debbie Flower will tell us why, as well as have suggestions for how to use those broken pot pieces elsewhere in the garden. And, she walks us through the process of making homemade hypertufa pots. What’s that? Give a listen, you just might be intrigued enough to try it yourself.
We’re podcasting from Barking Dog Studios here in the beautiful Abutilon Jungle in Suburban Purgatory. It’s the Garden Basics with Farmer Fred podcast, brought to you today by Smart Pots and Dave Wilson Nursery. And we will do it all in under 30 minutes. Let’s go!
Previous episodes, links, product information, and transcripts at the new home site for Garden Basics with Farmer Fred, GardenBasics.net. Transcripts and episode chapters also available at Buzzsprout
Pictured:
Early Girl Tomato
Previous episodes, links, product information, and transcripts at the new home site for Garden Basics with Farmer Fred, GardenBasics.net. Transcripts and episode chapters also available at Buzzsprout
Links:
Subscribe to the free, Beyond the Garden Basics Newsletter https://gardenbasics.substack.com
Smart Pots https://smartpots.com/fred/
Dave Wilson Nursery https://www.davewilson.com/home-garden/
All America Selections tomato winners
How to Make a Hypertufa pot
Hypertufa Pot Supplies
Got a garden question?
• Leave an audio question without a phone call, via Speakpipe, at https://www.speakpipe.com/gardenbasics
• Call or text us the question: 916-292-8964.
• E-mail: fred@farmerfred.com
All About Farmer Fred:
The GardenBasics.net website
The Garden Basics with Farmer Fred Newsletter, Beyond the Basics
Farmer Fred website:
http://farmerfred.com
Daily Garden tips and snark on Twitter
https://twitter.com/farmerfred
The Farmer Fred Rant! Blog
http://farmerfredrant.blogspot.com
Facebook: "Get Growing with Farmer Fred"
As an Amazon Associate, I earn from qualifying purchases from possible links mentioned here. And thank you for listening.
Thank you for listening, subscribing and commenting on the Garden Basics with Farmer Fred podcast and the Beyond the Garden Basics Newsletter.
.jpeg)
GB 203 TRANSCRIPT Plant Tomatoes in June? Yes!
Farmer Fred 0:00
Garden Basics with Farmer Fred is brought to you by Smart Pots, the original lightweight, long lasting fabric plant container. it's made in the USA. Visit SmartPots.com slash Fred for more information and a special discount, that's SmartPots.com/Fred.
Welcome to the Garden Basics with Farmer Fred podcast. If you're just a beginning gardener or you want good gardening information, you've come to the right spot.
Farmer Fred 0:31
Right now, in Mid-June, is still an excellent time to be planting tomatoes from transplants. It’s not too late, even for those of you in colder climates where frosts may occur in September. You just have to choose your tomato varieties a bit more carefully. We have the ones that will work for you, as well as tomato varieties for June planting for everyone in warmer climates.
What can you do with the shards from a broken pot? Lining the bottom of another container, perhaps?Not a good idea. Debbie Flower will tell us why, as well as have suggestions for how to use those broken pot pieces elsewhere in the garden. And, she walks us through the process of making homemade hypertufa pots. What’s that? Give a listen, you just might be intrigued enough to try it yourself.
We’re podcasting from Barking Dog Studios here in the beautiful Abutilon Jungle in Suburban Purgatory. It’s the Garden Basics with Farmer Fred podcast, brought to you today by Smart Pots and Dave Wilson Nursery. And we will do it all in under 30 minutes. Let’s go!
Farmer Fred 1:37
Even though it's June, it's not too late to plant tomatoes in much of the warmer zones of the United States, basically zone six through nine. But if you've never grown tomatoes before, which varieties should you choose? That's always a question among beginning gardeners. We asked Don Shor of Redwood Barn Nursery about that. He had some ideas on good tomato varieties to try that will make you feel like a successful gardener.
Farmer Fred
We usually recommend for people who are having lots of tomato fail failure and they're about to throw in the towel or for beginning gardeners who are planting their first tomato garden and by the way, it's June you can still plant tomatoes, is to have a cherry tomato, perhaps an early maturing full size tomato and then a full season tomato. For the beginning gardener maybe three hybrids might be in order.
Don Shor 2:31
Sungold it's still the most popular cherry tomato, there's others out there: Sweet 100, Sweet Million, all that crowd. Early Girl and Champion have proven extremely reliable. There's lots of others, that you can have fun with: Cherokee Purple, Black Krim, some of those other interesting heirloom types and see how they do for you.
Farmer Fred 2:51
Yeah, the Gardeners Delight, which is a little bigger than a cherry tomato, it's almost it's a little bit even bigger than a little grape size tomato, but still, it performs here for me. It was one of the first producers and one of the last producers around Christmas. Another thing to consider when picking out tomatoes is maybe look for the All America selections winners.
Don Shor 3:12
And we've talked about them before on previous shows, that'll generally be a reasonable guide for you because my understanding of that program, they've been tested in a wide variety of gardens in a wide variety of climates. So if it's an AAS winner, pretty good chance it'll do well, wherever you're listening. One that we've mentioned before is Big Beef, which was an AAS selection from the early 1990s. That's proven to be a consistent performer for me, three solid seasons out of that one. So again, I don't ever judge a tomato variety by one season. Maybe it'll give you 50 Fruit one year, and then the next year you'll be skunked. It's happened. But in general, if you see a consistent performance year after year, that's when to put it into your portfolio.
Farmer Fred 3:55
Yes, and indeed there are tomatoes at AAS that are actually winners in various climates. They have Western winners, Eastern winners, Southern winners, northern winners and then all around, throughout the United States, winners. So when you go to All America selections, and I believe their website is All-America selections.org . And I think there's a dash between the word “All” and “America”. So All-America selections.org has a great list of winning tomatoes; you might want to check that out too. And most nurseries carry those as transplants and of course, maybe next year you could start growing your tomatoes from seed.
Farmer Fred 4:38
That was Don Shor from Redwood Barn Nursery in Davis, California.
Again, you CAN plant tomatoes in June and expect a harvest later in the summer. Some tips for choosing a tomato plant from a nursery this time of year…and at last check, at least at the nurseries here in USDA Zone 9 in California, they have plenty of tomato plants available, and some may be on sale as their summer vegetable selling season winds down. Some nurseries may have even taken their tomato plants out of the six packs and four inch pots and have replanted them in larger containers. That’s a more mature plant, but you’ll pay a premium price.
Still, those tomato plants in larger pots may be your best option if you’re hankering for harvesting a full-size beefsteak tomato in late summer, such as Big Beef, Chef’s Choice or Beefmaster, which are tomatoes with slices that can cover an entire slice of bread.
On the other hand, you may find varieties of early ripening tomatoes in four inch pots on sale that have reached a larger growth stage where you might be harvesting a tennis-ball sized tomato in 30 or 40 days, such as Early Girl, Legend or Early Wonder, all of which would normally be bearing fruit in less than 60 days if transplanted at a smaller size.
And of course, you can’t go wrong with planting cherry tomatoes in June from transplants for a quick harvest. Cherry tomato varieties typically produce about 60 days after transplanting. Widely available, good tasting cherry tomato varieties include Juliet, Sungold, and Sweet 100. One of my favorite’s that produces in about 70 days but will keep producing until frost season is Gardener’s Delight.
Farmer Fred 6:20
You’ve heard me talk about the benefits of Smart Pots, the original, award winning fabric container. Smart pots are sold around the world and are proudly made, 100%, here in the USA.
Smart Pots is the oldest, and still the best, of all the fabric plant containers that you might find. Many of these imitators are selling cheaply made fabric pots that fall apart quickly. Not Smart Pots. There are satisfied Smart Pot owners who have been using the same Smart Pots for over a decade, actually approaching 20 years.
When you choose Smart Pot fabric containers, you know you’ll be having a superior growing experience with the best product on the market.
And your plants will appreciate Smart Pots, too. Because of the one million microscopic holes in Smart Pots, your soil will have better drainage, and the roots will be healthier. They won’t be going round and round on the outside of the soil ball, like you see in so many plastic pots. The air pruning qualities of Smart Pots create more branching of the roots, filling more of the usable soil in the Smart Pot.
Smart Pots are available at independent garden centers and select Ace and True Value hardware stores nationwide. To find a store near you, or to buy online, visit smart pots dot com slash fred. And don’t forget that slash Fred part. On that page are details about how, for a limited time, you can get 10 percent off your Smart Pot order by using the coupon code, fred. f-r-e-d, at checkout from the Smart Pot Store.
Visit smartpots.com slash fred for more information about the complete line of Smart pots lightweight, colorful, award winning fabric containers and don’t forget that special Farmer Fred 10 percent discount. Smart Pots - the original, award winning fabric planter. Go to smart pots dot com slash fred.
Farmer Fred 8:19
You want to start the backyard fruit and nut orchard of your dreams? But you don’t know where to begin? Or, maybe you’re currently growing fruit and nut trees, and you have a million questions… such as what are the tastiest fruits to grow, where can I go to buy some of these delectable fruits and nuts you’ve been reading about…and, how do I care for all these fruit and nut trees, including planting, pruning and harvesting?
I have one online stop in mind, where all these questions you might have will get answered:
It’s dave wilson dot com, That's Dave Wilson Nursery, the nation's largest wholesale grower of fruit and nut trees for the backyard garden. They have planting tips, taste test results, and links to nurseries in your area that carry Dave Wilson fruit trees.
Click on the Home Garden tab at dave wilson dot com for all these links, including a link to their years of informative videos about growing fruit and nut trees that they’ve posted on the Dave Wilson Nursery You Tube Channel. Start the backyard orchard of your dreams at Dave Wilson Dot Com!
Farmer Fred 9:22
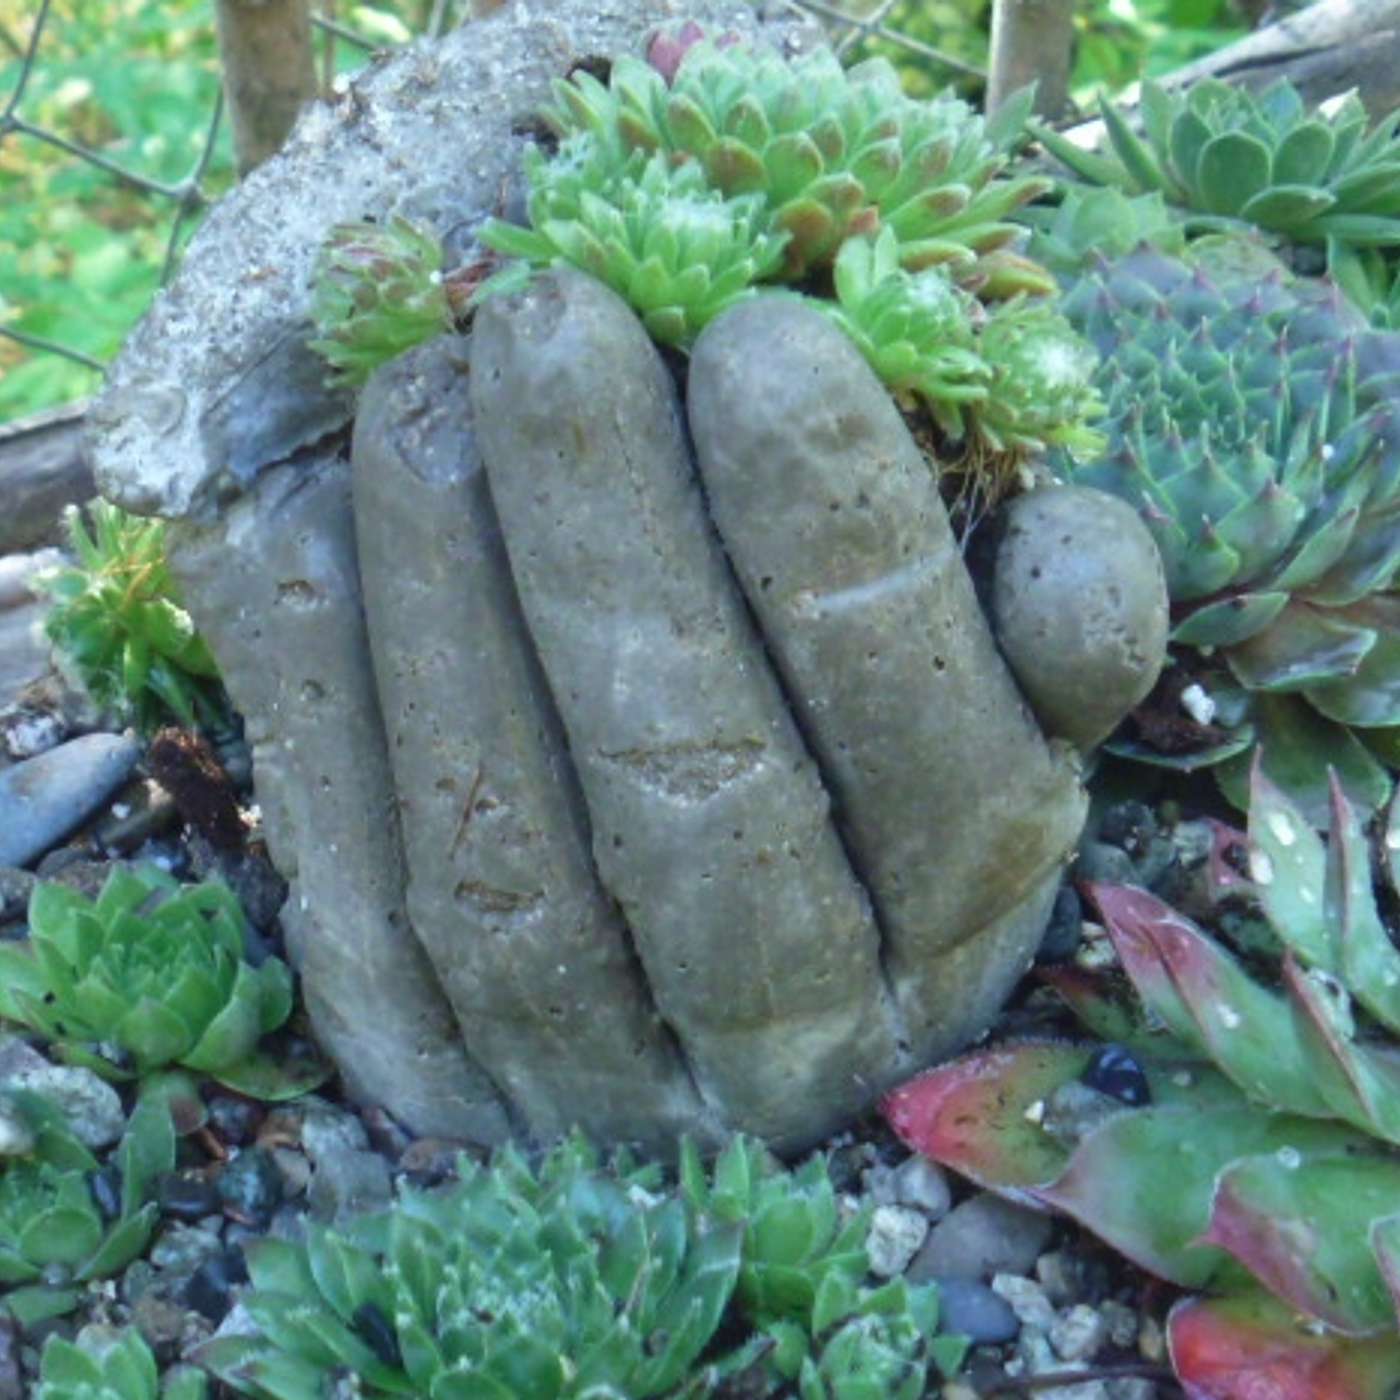
If you want more information about gardening, I would suggest you visit the Get Growing with Farmer Fred Facebook page where there are a lot of posts and a lot of comments. In one recent post there I had a picture of my big, broken, ceramic pot. It's really a very pretty ceramic pot with a big hole in the side. I was trying to remember how that hole arrived there. And somehow I remember kicking it or I must have hit it with something. Debbie Flower is here, our favorite retired college horticultural professor; or rather, America's favorite retirement college horticulture professor and the whole point of that was to talk about the value of reusing potting soil, which we've talked about many times on this program, Debbie.
Debbie Flower
Yes, we have.
Farmer Fred
But people wanted to do something with the broken pieces of the ceramic pot that were laying there.
Debbie Flower 10:13
Kudos to them. I'm a reduce, reuse, recycle person myself. So that reusing is helpful to the world.
Farmer Fred 10:19
So let's dive into the most common comment people made on there, about putting those shards at the bottom of another pot.
Debbie Flower 10:29
I grew up with my mother and grandmother doing that, and I watched them do it. And it is done so that the new media and new container media, the dirt, doesn't fall right out the bottom of the pot through those drain holes, which are sometimes pretty big, half inch inch across. I did it for a while. And then I would take the plant out of the pot and later realize that the roots had grown all around it and that piece of shard was embedded in the roots of that plant.
Farmer Fred 10:56
People seem to have a different version of how to use them at the bottom of the pot, too. It's like if you lay them the wrong way, you could be blocking the drainage holes. But if you turn them over, so they're convex, I guess.
Debbie Flower 11:10
They're like a dome.
Farmer Fred 11:14
Yeah, they're like over the hole, that would still allow for protecting the soil. I mean, that's what people were worried about. If you don't have those shards in the bottom of that pot, the soil is just gonna drain right out.
Debbie Flower 11:24
I understand the fear. But you can do it absolutely wrong if you do it. So it's like positioned the other way, so It's not a like a rocking chair, then yes, you can close the hole and the plant will will drown. But there's really no need to cover those holes. I stopped doing it after I saw it all embedded in the roots of the plant . If you moisten the media, especially before you put it in the pot, almost nothing falls out that hole.
Farmer Fred 12:05
Anyway, if you make them like a dome, like you say, right, it can protect that draining issue, which may or may not be an issue, right, but you're also reducing the volume of that pot to hold soil.
Debbie Flower 12:25
If people start putting a shard in the bottom of the container, sometimes they put a lot of shards, or sometimes they put a layer of gravel or some such thing in the bottom of the container. And it's still published in places, gardening places, that says that helps drainage. And the fact is, it’s absolutely the opposite. It does not help drainage. Water takes the path of least resistance. And when it goes through media and hits a very drastic texture change like a layer of rocks or pot shards, it stops. And so the water then creates a saturation zone in the bottom of the media. And if you pour more water in the top, it'll push some of that saturation water out. But it replaces the saturation with the water, you just pour it in. So you're always it's a condition of growing in containers is that you always have a saturation layer in the bottom of the container after you've watered it and it has drained, there's nothing you can do about that. But providing the correct depth of roots on for the plant will keep the roots out of that saturation layer.
Farmer Fred 13:25
Think of it as a traffic jam for water, you're going down the freeway, you look ahead and you see some smoke off on the side of the road. And as you get closer you see it's a car on fire, but it's on the side of the road. But you're gonna slow down and look at it. And as you slow down and look at it, every car behind you slows down and looks at it. And it gets worse as the further back you go to a point where the traffic is stopped, because you slow down from 65 to 15 miles an hour or whatever. And that's exactly what water does. When it comes across items at the bottom of the pot that are different from what they've been flowing through. Right? It just says Oh, what's this? Let's let's take a look. We got to be careful here. Let's slow down. Let's see what's going on here. And before you know the water is backed up, and it takes a lot longer to drain out if it drains out at all right?
Debbie Flower 14:12
The only time it's useful to do something like that is when you get one of those four foot tall, fancy expensive containers to grow in because it looks good next to your front door. Then you can put something in the bottom foot so that you have only a three foot growing area.
Farmer Fred 14:31
And especially if it's one of those lightweight pots that look like they're ceramic, but in reality there's something else.
Debbie Flower 14:38
Yeah knocked over by the nightlife in your yard or whatever.
Farmer Fred 14:43
So I could see adding weight to the bottom would help. One of the worst suggestions I ever heard was putting Styrofoam in the bottom 1/3 of the containers.
Debbie Flower
Styrofoam is a bad actor.
Farmer Fred
Well, not only that it doesn't add any weight so you're just making the pot even more top heavy when you do that.
Debbie Flower 15:05
So yeah, don't use Styrofoam. it's big polluter. And once it's out in the environment, we can't re-catch it.
Farmer Fred 15:10
And it stops the water from flowing in the pot.
Debbie Flower 15:12
It's a bad actor too. Yeah.
Farmer Fred 15:13
So don't do that. People did make some very interesting suggestions with the shards from the broken pot as far as what you can do with them. I like Mary's idea of laying them on top of the potting soil and planters to keep the squirrels from digging in them. And she says here on the Facebook page, “so far, so good”.
Debbie Flower 15:33
And the squirrels can be a real pain. I had them take out stuff out of pots, I took the pots and put them away because the squirrels were such a pain.
Farmer Fred 15:40
Good idea, Mary, were they taking stuff out, or planting acorns?
Debbie Flower 15:45
Well, their goal was to plant the acorns. But in the process, they were taking other things out.
Farmer Fred 15:48
Yeah. Some other ideas for using those shards from the broken pot. I like this one is using them as plant markers.
Debbie Flower 15:55
I hadn't thought of that. That's a great idea.
Farmer Fred 15:57
What color permanent marker would you use?
Debbie Flower 16:00
I would use black. But I suppose you can get a white one. Are there white permanent markers?
Farmer Fred
I imagine. Yeah. So that's something else you could do with it. And then all terracotta is sort of that reddish color. There's no white terracotta.
Debbie Flower 16:12
Not that I'm aware of.
Farmer Fred 16:15
Since we're on this subject, can we talk hypertufa Pots?
Debbie Flower
Oh, sure.
Farmer Fred
Okay, let's talk hypertufa pots, since we're in a pot frame of mind here, so to speak. hypertufa. You mentioned that on an episode awhile back that in your college classes, the students would be making hypertufa pots. what is a hypertufa pot?
Debbie Flower 16:37
It's kind of a trough. I don't know where it started. The reason we started it was we had lots of leftover media. And we always want the students to be successful. And so we we started a lot of seeds. So we didn't want to reuse the media. That's one place where I will not reuse media, is when I'm starting seeds, because seeds starting from seeds because seedlings can get diseases from the media that mature plants would not get. And specifically that's called damping off. So we had a big pile of use media at school that we didn't know what to do with. And it was made primarily of peat moss, perlite, and vermiculite, which is a very classic mixture for container plants. You'll find it at Cornell University, you'll find a UC Davis mix. And they contain those three ingredients: peat moss, perlite and vermiculite. So I was looking for something to do with them and the hypertufa pot idea came up. And what you do is take one part cement, and it has to be cement, not concrete, and three parts of that leftover container media. And if you don't have leftover container media, then you can make those three parts with half volume of peat moss and half of volume of perlite, that would be your least expensive combination, you could probably use coir and perlite as well to make your three parts. And so we got a big wheelbarrow and we had containers and we just had the students picking up containers of cement, throw it in, add a little water, fill up three containers of the same size of the leftover media, mix it together. You can get concrete dye, cement dye, it's expensive, it's the most expensive part of the job, it's coloring it, and you can make them into color. So you can color the mix. Depending on how wet it gets. If you have it like slick oatmeal, and you're very artistic or whatever, you can just form the pot yourself freehand. We used molds. We took grow pots and oiled them with vegetable oil and then put the media in side the Grow pot and then had another smaller so let's say we used to number five and a number one. The number five would be our outside mold. We grease with the vegetable oil the inside of the number five, then set the number one in the middle of it and the number one would have grease on the outside of the pot. And before we set that number one and we took a little piece of PVC pipe we would cut it into about two inch thick, two inch long pieces of one inch thick PVC pipe, any kind you got lying around doesn't matter what grade PVC it is, that's for your drain hole. We didn't grease that maybe we should have because sometimes it didn't come out at the end. So two inches thick is important as well because the walls of the hypertufa pot need to be two inches thick or they will break once you take it out of the pot. And then so we set up our molds. But the two inches in the bottom stick the PVC pipe into that two inches, put the number one on top of it and then fill in around the edges. And we let it set. setting time varies by humidity temperature. How wet your media, your hypertufa media, was one day sometimes often in teaching it would be a week because I wouldn't see the students in lab for another week. And then we'd take them out and typically out of plastic pots, they came out fairly easily. And depending on how wet they were, we would then mold the edges, the corners. If they're real dry, you just use a brick. And you can take those 90 degree edges and sand them down to be softer. It was a fun, it was an artistic thing. I've had the pots and we didn't quite know what we were dealing with. So we planted in them to see what happened. We could grow anything, I was worried that the cement would lead to a high pH. And so, acid loving plants would do poorly in the pot. We had no problem with it whatsoever. We've grown all kinds of things: annuals, perennials, woody plants in these pots, and they are great insulators. Because of that thick two inch wall you can put them out where they get full sun on the side of the container and not absorb enough heat to harm the roots.
Farmer Fred 20:50
What diameter PVC pipe did you use for the drain holes? One inch? That's a big drain hole.
Debbie Flower 20:55
Well, the PVC pipe Yeah, it is. Sometimes the PVC pipe didn't come out of the bottom of the pot. So the hole would only be whatever the senator diameter of the the one inch pipe was so that would be better. Yeah. Smaller.
Farmer Fred 21:09
How did you remove the extraneous pipe?
Debbie Flower 21:13
Typically, we could knock it out. But sometimes that just stayed
Farmer Fred 21:17
well when it stayed though. Did you cut it down. So it wasn't so obvious?
Debbie Flower 21:20
We had two inch pieces of pipe two inch okay. And then we laid two inches of the media around it. You got to have two inch walls on these things. We had bottom and bottom inside. All right, yeah. And we've we got real creative. I think of it as real creative. We used garbage cans, that I guess they were 30 gallon, they probably were bigger. We turned 15 gallon pot upside down, inside. a number 15 Inside the bottom of the garbage can. And that gave us two inches around the outside and two inches over the top. So we had a a dome. Then we put a piece of PVC right in the middle of the flat. What was on top of the 15 the flat that was our drain hole. Then we put another 15 on top of it and created an urn a pot so we had a very tall pot that was as tall as this big garbage can. But it only had a gross base of the size of 15 gallon pot or a number 15 pot.
Farmer Fred 22:25
A 15 Is…
Debbie Flower 22:26
18 by 18 inches.
Farmer Fred 22:28
Thank you. 18 by 18 and it just seems like it would be heavy but it's not.
Debbie Flower 22:33
They’re not that's the beauty of these. Yeah, because you're using three parts media and one part cement. They're not heavy. They're heavier than those plastic ones that look like they're they're ceramic, but not by much.
Farmer Fred 22:45
I liked the idea of your students decorating the outside of it while it's still moist , doing imprints of leaves or something like that.
Debbie Flower 22:53
Right. That's a little tricky because you have to put the leaf in first and then pour the media over it. And it but you get an impression. I did grape leaves on one and it came out quite nice. And then across the top I told students to bring in whatever bric-a-brac they wanted. they would bring marbles or beads or whatever. We would stick in them.
Farmer Fred
I'd bring beer caps.
Debbie Flower
Okay, well, beer caps would stick quite well. The stuff on top of it wasn't pushed in far enough. Didn't all stick. So it was a little bit squirrely up there.
Farmer Fred 23:30
All right. hypertufa pots. I guess I spelled it right: HYPERTUFA, we will have a link in today's show notes, Lowe's has a video on how to make them, too. So if what we were saying sounded confusing, this might help.
Debbie Flower 23:45
There are lots of videos actually about making them. And they were traditionally used for I saw them in the Brooklyn Botanic Gardens and they were made into rectangles. That's another beautiful thing. We talked about using round pots. But we did one that was rectangular, and we got a box and lined it with plastic. It did have sort of bulge in the sides because the box wasn't real stiff. It was a cardboard box. So it bulged out a little bit. At the Brooklyn Botanic Gardens, they had rectangular ones that were probably six inches tall, maybe eight or 10 inches tall because you need a three to four inch growing depth for succulents. And they planted succulents, some of them hung over the sides, and so they were stacked. It is very artistic. And in a moist climate like they have there, they can grow moss on them. And there are ways you can encourage the moss to grow because they have a nice rough outside.
Farmer Fred
You have a favorite hypertufa video?
Debbie Flower
Yeah, there are many out there and the components of the media vary slightly and their methods of putting them together vary slightly. So yeah, it's a good idea to watch a few of them and see what you want to try.
Farmer Fred 24:58
I would think, too, that being two inches thick, they're - I won't say impervious to heat - but they're certainly more heat resistant. Right?
Debbie Flower 25:06
They're great insulators. So in a hot climate like we have, they protect the roots better. Now I have not put them out in a hard freeze or extended hard freeze. We get hard freezes here once a year, maybe. And they've been outside and they've done just fine. But in a much colder place that has repeated and extended hard freezes, you probably have to take them inside, or they would crack.
Farmer Fred 25:30
And excuse this question, because I'm old, and you may have already said this: How many drain holes do you put in each pot?
Debbie Flower 25:36
I've done one. I've done three. It varies. Obviously too many would make the bottom weak. So you'd want to have maybe four inches between them. Three to four inches between them and between them and the edge.
Farmer Fred 25:48
All right. This is sort of trial and error thing.
Debbie Flower 25:51
Oh, it's it's an experimental thing. Yes. It’s freeing to be able to do it. The only ones that have failed, that I know about, are the ones where the walls were too thin. All right, every other thing we tried. Well, actually, we tried big PVC pipe as the mold and it stuck to the PVC. We could not get it out.
Farmer Fred
Are there molds available?
Debbie Flower
I'm not aware of any.
Farmer Fred 26:15
Okay. All right. For you entrepreneurs out there. Go for it. Yeah, have a good time. All right, hypertufas. We came a long way from broken pot shards when we started, Debbie Flower. Thanks so much.
Debbie Flower 26:29
You're welcome.
Farmer Fred 26:31
One of my favorite aisles at the big hardware stores is the drip irrigation aisle. It’s almost like a church in that space. People are silently staring, straight ahead at the morass of bins containing strange looking drip irrigation parts…and those people are more than likely praying for guidance that they can unravel the mysteries surrounding drip irrigation. In Friday’s Beyond the Basics newsletter, we try to guide you to the right bin so that drip irrigation, a very efficient way to water your plants, doesn’t become drip irritation. Well, at least we attempt to try to manage your irritation. It’s inevitable. In Friday’s combination of newsletter and podcast, we talk with garden author Robert Kourik who literally wrote the book about drip irrigation. In the newsletter portion, I’ll show you some of the best options available for irrigating your plants with less water. It’s in the newsletter that goes beyond the basics, the Garden Basics with Farmer Fred, Beyond the Basics newsletter, out Friday, June 17th. Find it via the link in today’s show notes, or visit our new website, Garden Basics dot net. There, you can find a link to the newsletter in the tabs on the top of the page. Also, you can listen to any of our previous editions of the podcast, as well as read an enhanced transcript of the podcast episode you are now listening to. That’s at Garden Basics dot net, where you can also link to the Garden Basics newsletter, Beyond the Basics. And it’s free. Look for it on Friday, June 17th. Take a deeper dive into gardening, with the Beyond the Garden Basics newsletter. Find it at garden basics dot net.
Farmer Fred 28:18
Garden Basics With Farmer Fred comes out every Tuesday and Friday and is brought to you by Smart Pots and Dave Wilson Nursery. Garden Basics is available wherever podcasts are handed out. For more information about the podcast, visit our website, GardenBasics dot net. That’s where you can find out about the free, Garden Basics newsletter, Beyond the Basics. And thank you so much for listening.