
How to Cut a Track in Audacity
When you start editing your podcast episodes, there's a good chance you'll need to remove some of the audio you recorded. After all, you don't want your listeners to have to sit through five minutes of rambling while you get your thoughts together, or endure 30 seconds of silence at the end of an episode.
That's where cutting and trimming comes into play. These actions let you remove parts of the audio you don't want your listeners to hear without having to worry about being perfect when you're recording.
In this tutorial, we'll show you various ways to cut your audio to make quick work of removing errors in your clips.
Note: For this tutorial, we use the Command key in our keyboard shortcuts. But if you use a PC, replace Command with the Control key.
But first, import your audio!
If you haven't already, download Audacity for your operating system (Mac, Windows, or Linux) to get started!
Once you install the program, open Audacity and import your audio by going to File menu > Import > Audio. Double-click on the file you want to work on, and you should see it appear in the workspace. Audacity supports WAV files, MP3, and AIFF. You can also record new audio directly into the DAW through your chosen input.
There are four main ways to play with the structure of your audio recording: Split, Cut, Delete, and Trim. Let's dive into each command so you can learn which function best applies to different situations.
#1. Split a track into two clips
The Split action lets you break up one track into multiple clips you can individually edit. In this example, we've uploaded our file to the workspace and grabbed the Selection tool — the I-beam icon in the top toolbar.
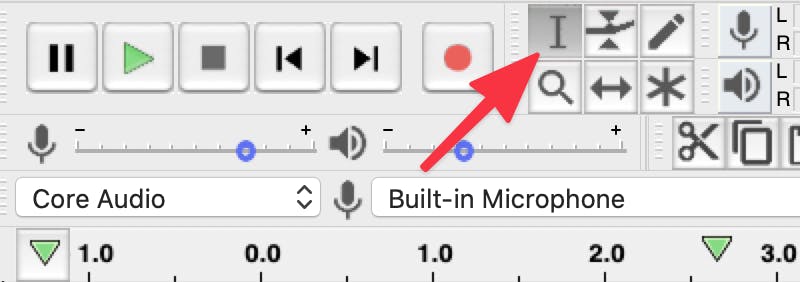
With the Selection tool chosen, place the cursor where you want it to be. Let's say you want four minutes and 45 seconds. From there, go to Edit menu > Clip Boundaries > Split. You can also use the keyboard shortcut Cmd + I.
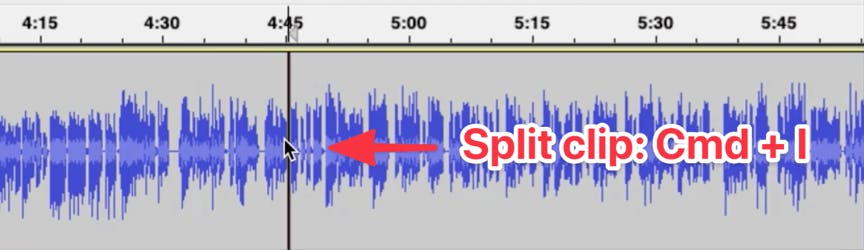
A dark line will appear to show you exactly where you split your audio file. When you grab the Time Shift tool, you can move each separate clip around the timeline and apply unique edits to each one. You can also drag your audio to create a space between clips, move it to a new track, or delete it altogether.
#2. Delete audio (without shifting files)
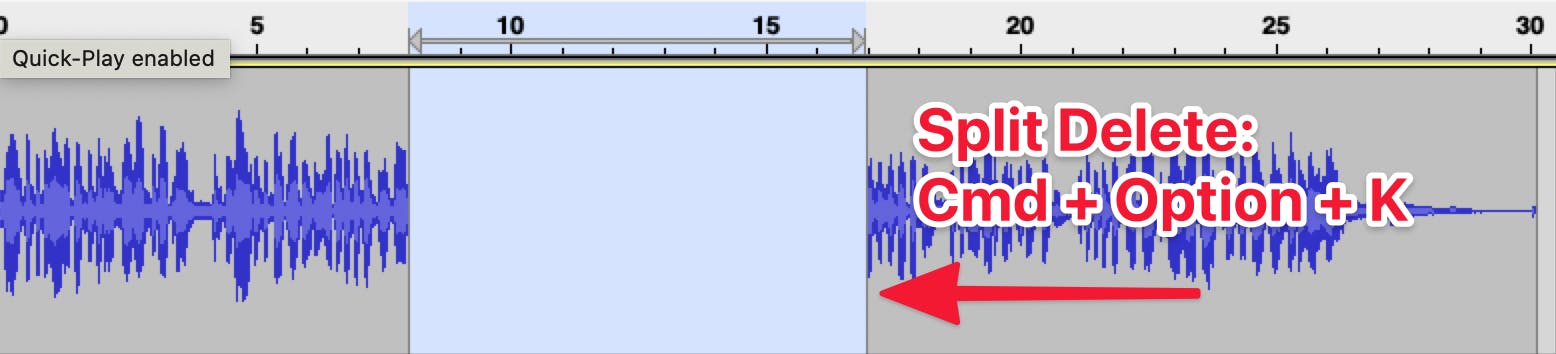
The Delete command removes a selected area without shifting the audio to the right of the selection, leaving a space where the audio once was. Delete comes in handy when you want to create a gap between clips to insert a segment, interview, or advertisement.
To delete a portion of your audio, highlight the selection and go to Edit > Remove Special > Split Delete, or use the keyboard shortcut Cmd + Option + K. As you can see in this example, the command deleted the selected audio and did not shift the clip over.
Note: In Audacity, the Delete key signals the Cut command — not Delete!
#3. Cut individual segments (with shifting files)
The Cut command is an essential tool for removing unwanted audio segments in the middle of your track without leaving a space in its place. Whether it's a long pause, a cough, or just a flub-up, knowing how to delete these errors helps you relax while you're recording, knowing you can take care of the mistakes later.
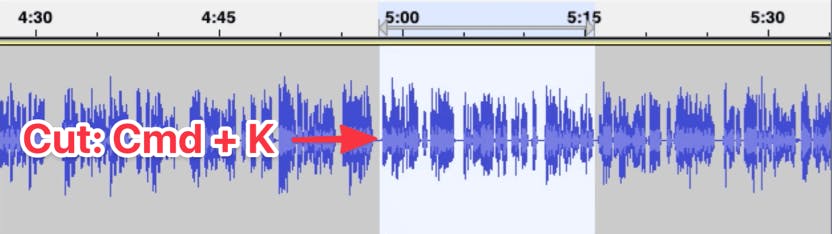
Unlike the Delete command, Cut removes a selected area of your audio and shifts everything to the right of that selection over to replace it, removing the gap where the audio was.
In this example, we highlighted the section right before five minutes up to the 5:15 mark. To cut the section, you would take your Selection tool and drag to highlight the portion you want to remove. Now, any editing done in Audacity will apply only to the selected audio. Press Cmd + K to remove the highlighted portion and shift the files to the right over so there is no gap between clips.
Pro tip: Before you Cut, you can press Cmd + 1 (or Ctrl + 1) to Zoom in for an accurate view of the clip; press Cmd + 2 to return to normal view.
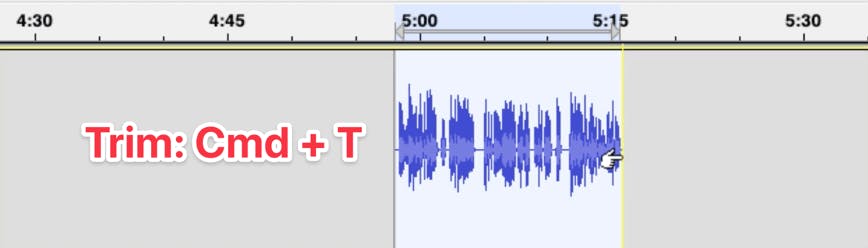
#4. Trim audio files
Regardless of the kind of recording, your track probably has some dead air at the beginning or end. In this situation, you want to keep the highlighted selection and delete everything else around it. This action is called trimming your audio and works great for removing dead air with one click.
To trim your audio, highlight your selection and use the shortcut Cmd + T. This command deletes everything except the highlighted portion.
You can press your keyboard's SpaceBar for instant playback to make sure you like the edit. The SpaceBar is a shortcut for both the Play button and Stop button.
If the edit sounds good to you, apply the trim by going to Edit > Remove Special > Trim Audio (or Cmd + T). Remember, trimming the audio will delete any part of the file not highlighted.
All the Audacity keyboard shortcuts will become muscle memory before long. But until then, you can find each command shared in this blog in the Edit drop-down menu.
Note: If trimming created dead space at the start of your clip, don't worry. Audacity will ignore the gap (or "white space") between zero time and the start of your track. But if the gap bothers you, just take your Time Shift tool to move the waveform to the beginning (or go to Tracks > Align Tracks > Start to Zero.)
Additional tips, tricks, and shortcuts
Some creators prefer using their mouse as the primary way of editing a waveform. But if you want, you can highlight sections of audio and apply edits directly from your keyboard. Most creators end up doing a little of both. Here are some more keyboard shortcuts that can speed up the process of cutting, trimming, deleting, and splitting clips.
Highlighting clips
- Press Shift + Left arrow to expand the highlighted section to the left.
- Press Shift + Right arrow to expand the highlighted section to the right.
- Press Shift + Cmd + Left to shorten the clip from the left.
- Press Shift + Cmd + Right to shorten the clip from the right.
Undo and Redo
Audacity lets you undo any mistake you make throughout your editing session and redo actions you've undone, too. You can undo all actions going back to the first one you made after importing the file.
- You can use the Cmd + Z shortcut or go to Edit > Undo.
- Redo an action by pressing Up arrow + Cmd + Z.
More Audacity tutorials
The more you edit in Audacity, the more comfortable you'll get applying these edits. The good news is, basic edits will probably make up the bulk of your work in post-production, and most podcasters get the hang of the process quickly!
Audacity is an excellent open-source, audio editing tool that is widely used by digital audio creators. These tutorials can help you get more comfortable, so you can use Audacity to confidently edit your own podcast!