
How to Remove Background Noise in Audacity (3 Steps)
Podcast recordings rarely come out perfect, so it’s important to know how to clean up your audio and remove noise from certain sections.
In this tutorial, we'll show you how to use Audacity's noise reduction effect to remove distracting sounds while keeping your original audio intact!
JUMP TO A SECTION:
How to prevent background noise
The best way to deal with background noise is to avoid it altogether. These tips help prevent the need for noise reduction and reduce your time spent editing.
Optimize your recording space
Where you choose to record audio is the most crucial factor in its quality. To improve your podcasting space, find a quiet, small room away from:
- HVAC units
- Traffic
- External hard drives
- White noise
- Air conditioners
You can also improve your room tone by choosing a space with natural sound absorbers like curtains, rugs, carpets, and couches.
Use a dynamic mic
Dynamic mics work best for podcasting. They pick up lower frequencies and have less sensitivity.
Condenser mics have more sensitivity and pick up a wider range of frequencies. Sensitivity is good for recording music but isn’t ideal for spoken word.
The Samson Q2U is our top pick for an affordable, quality, dynamic mic with USB and XLR hookups.
Turn down the gain and get close
Turn down your mic's gain (sensitivity) and move close. Speaking directly helps your mic focus on picking up the frequency of your voice.
Minimize computer fan noise
Computers can make a lot of noise when they get hot. Turn your mic away from the computer to help mitigate this effect and reduce the amount of software running to prevent the fan from activating.
Pro tip: Adjust the gain of your recorder (or DAW) so your voice peaks around -12 and -10db.
Remove background noise in Audacity (3 steps)
Follow these three steps to remove background noise within Audacity.
If you haven't already, download Audacity and go to File > Import > Audio to select the track you want to edit.
Step #1. Get a noise sample
Help Audacity isolate the background noise you want to remove. In this example, we isolated some unwanted fan noise from the audio recording.
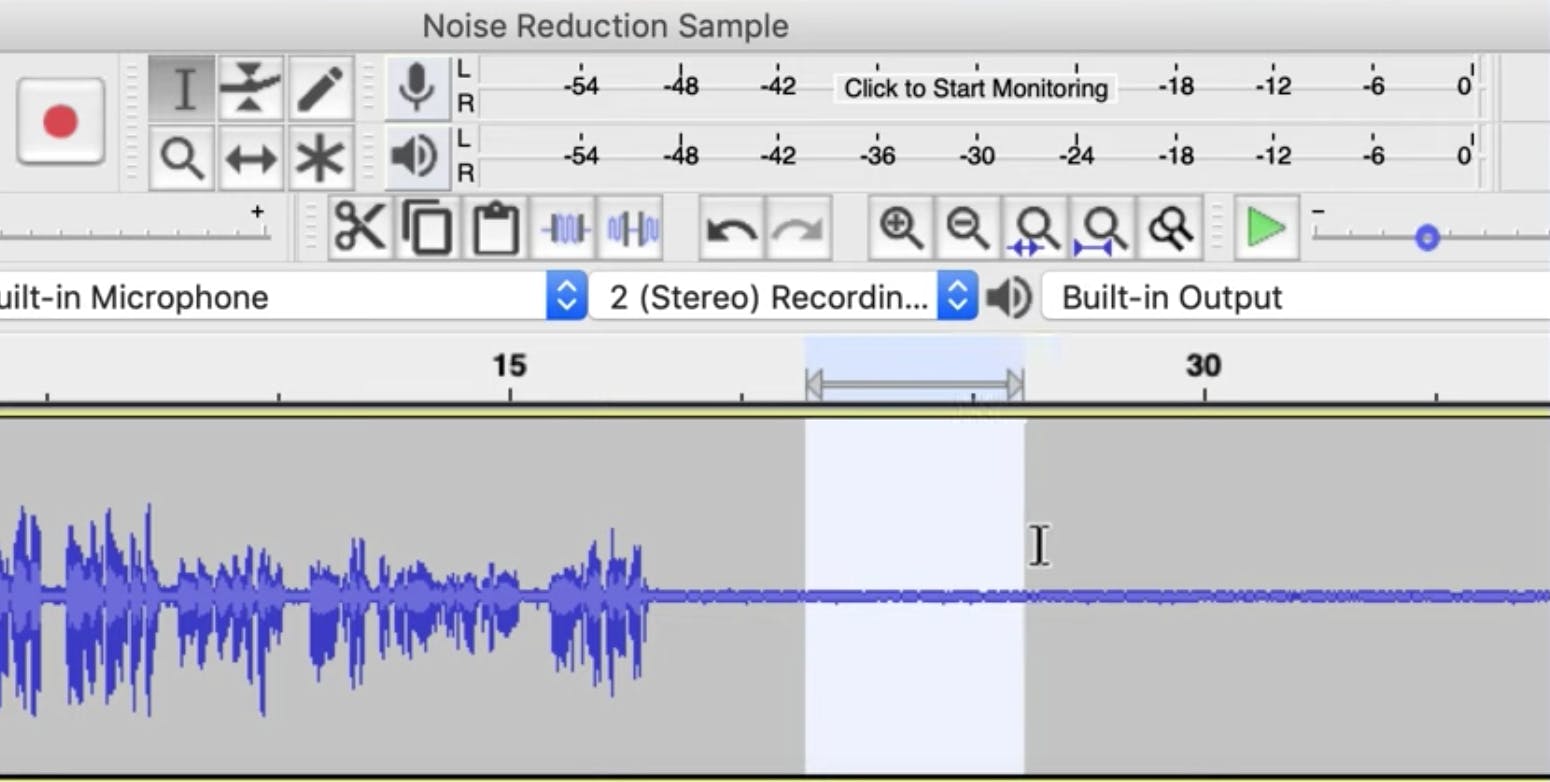
Then, we let Audacity know the frequency we want to remove. Make sure you select a section where no one's talking.
If you don't have a selection this big, find somewhere in the audio you can isolate. The important thing is to isolate a section with only the background noise, so it doesn't ruin your voiceovers, dialog, music, etc.
Now, click and drag your selection with the Selection tool.
Step #2. Apply noise reduction
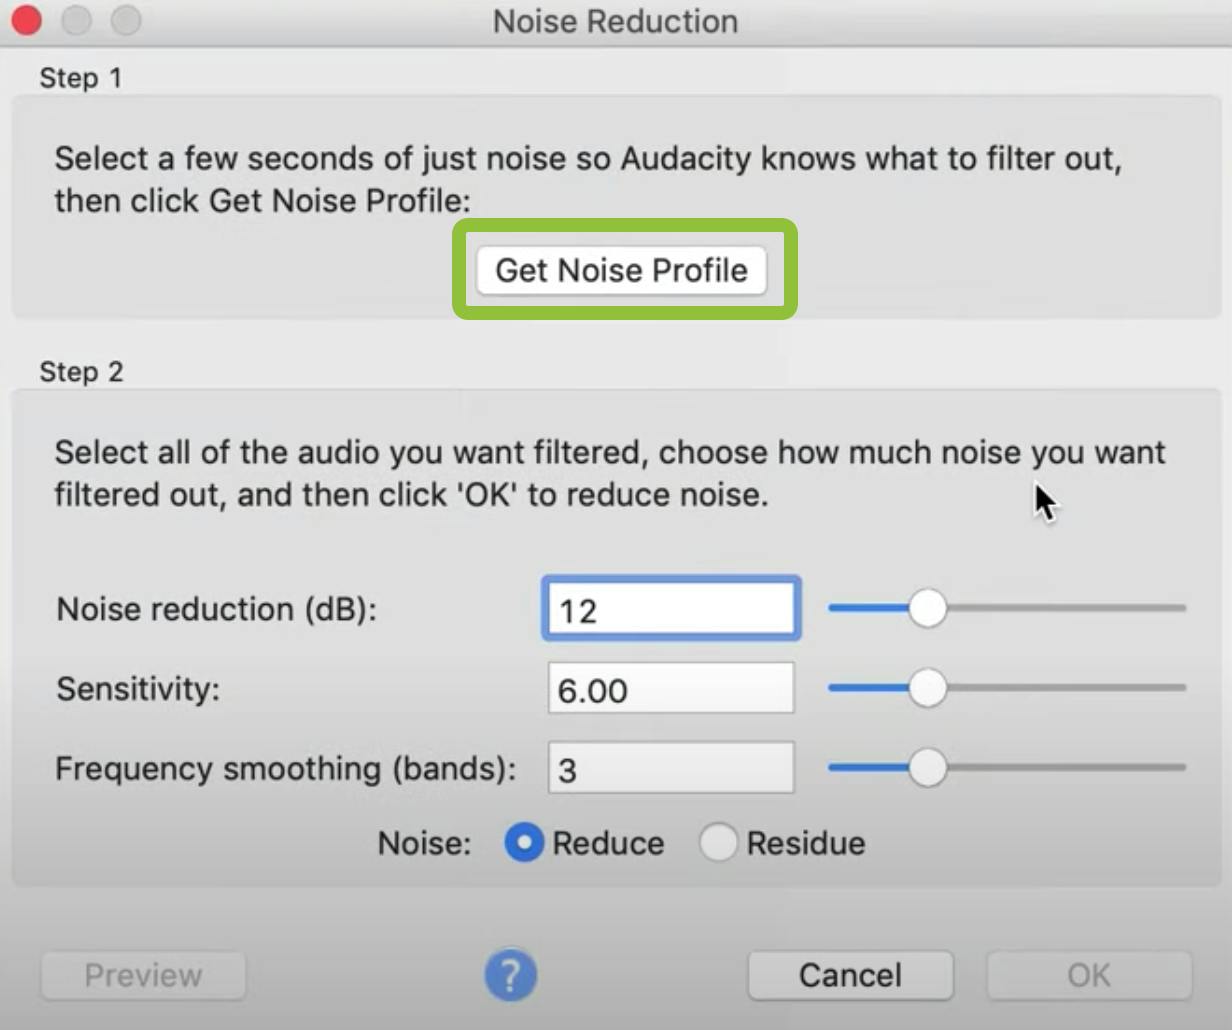
Once you isolate your clip, click Effect > Noise Reduction. Click Get Noise Profile. The Noise Profile button lets Audacity know which frequencies to filter out and which to ignore.
Now, select the entire track so Audacity can remove the selected frequency from the entire recording.
Go back to the Effect menu and select Noise Reduction again to remove the background noise frequency anywhere it appears in your audio file.
#3 Tweak the settings
Select the amount of noise reduction you want Audacity to remove. Be careful not to overdo it, otherwise, your audio will sound like it's underwater.
As a general guideline, 12 decibels is a good place to start.
Next, adjust the sensitivity and frequency-smoothing bands. We suggest leaving these on their default settings of six and three.
From here, you can preview your audio with these settings applied. When you find the right level, click OK.
To remove any remaining noise, hit Command + Z (or Ctrl + Z), and choose the Noise Reduction effect. Increase the effect by a few decibels and hit OK.
Now, recheck the audio to see how it sounds. You might have to repeat that step a few times to get a good result.
Additional thoughts and resources
When you use noise reduction, it's important to apply just enough so you don’t sacrifice audio quality somewhere else.
Once you master the art of noise removal, you have a powerful tool you can use to optimize your audio!
Audacity is a powerful, open-source, audio editing tool widely used by podcasters. Check out these tutorials for more tips and tricks!

Alban Brooke
Alban Brooke is the Head of Marketing at Buzzsprout and the co-host of Buzzcast. Have any questions about this guide? Reach out on Twitter.
FAQ
Can I edit my podcast with Audacity on my Android or iPhone?
Audacity does not have a smartphone app so you cannot currently edit using your phone. Audacity is compatible with Mac, Windows, and Linux.
How do I get rid of background noise in Audacity?
To get rid of background noise using Audacity, first, highlight the part of your audio you want to clean up. Then, go to the Effects menu and select Noise Reduction > Get Noise Profile to tell Audacity how much noise to remove.