The Complete Guide to Auphonic for Podcasters
Auphonic is a powerful audio optimization software that helps podcasters create high-quality audio with minimal effort. Whether you're starting a new podcast or you're a seasoned sound engineer, Auphonic is a trusted tool for improving audio quality without needing a degree in audio editing. At Buzzsprout HQ, it's one of our go-to tools for podcast production, and we think it might become one of yours, too.
In this tutorial, we'll walk you through how to use Auphonic’s automatic audio tools to polish your audio files, optimize audio levels, and prepare each of your podcast episodes for publishing.
New Production
To get started, create a free account on auphonic.com. Then click the "New Production" button on the homepage.

Auphonic offers many tools and editing capabilities! First, we’ll tell you about the tools we recommend you use and then do a brief overview of the others.
Audio or Video Source
Under "Select Upload Method," leave it as "File" and click "Choose File" to upload your audio recording or video.

Output Files
Auphonic supports many standard file formats. At Buzzsprout we prefer to use the “WAV 16-bit PCM” format to maintain a high-resolution, lossless audio file.
Certain formats allow you to customize your Bitrate. If you select “WAV 16-bit PCM,” then there is only one bitrate option available. If you choose to export your podcast to an MP3 file, we recommend using a bitrate of 192 kbps.
Check the “Mono” box if your episodes don’t require stereo separation. Most podcasts benefit from mono, especially if you’re using podcast hosting platforms like Buzzsprout, which optimize mono delivery.
Note: If you are on one of our standard Buzzsprout plans your podcasts are uploaded as mono files, so select “Mono” here as well. If you have upgraded to include 192k Stereo Optimizations, leave “Mono” unselected.
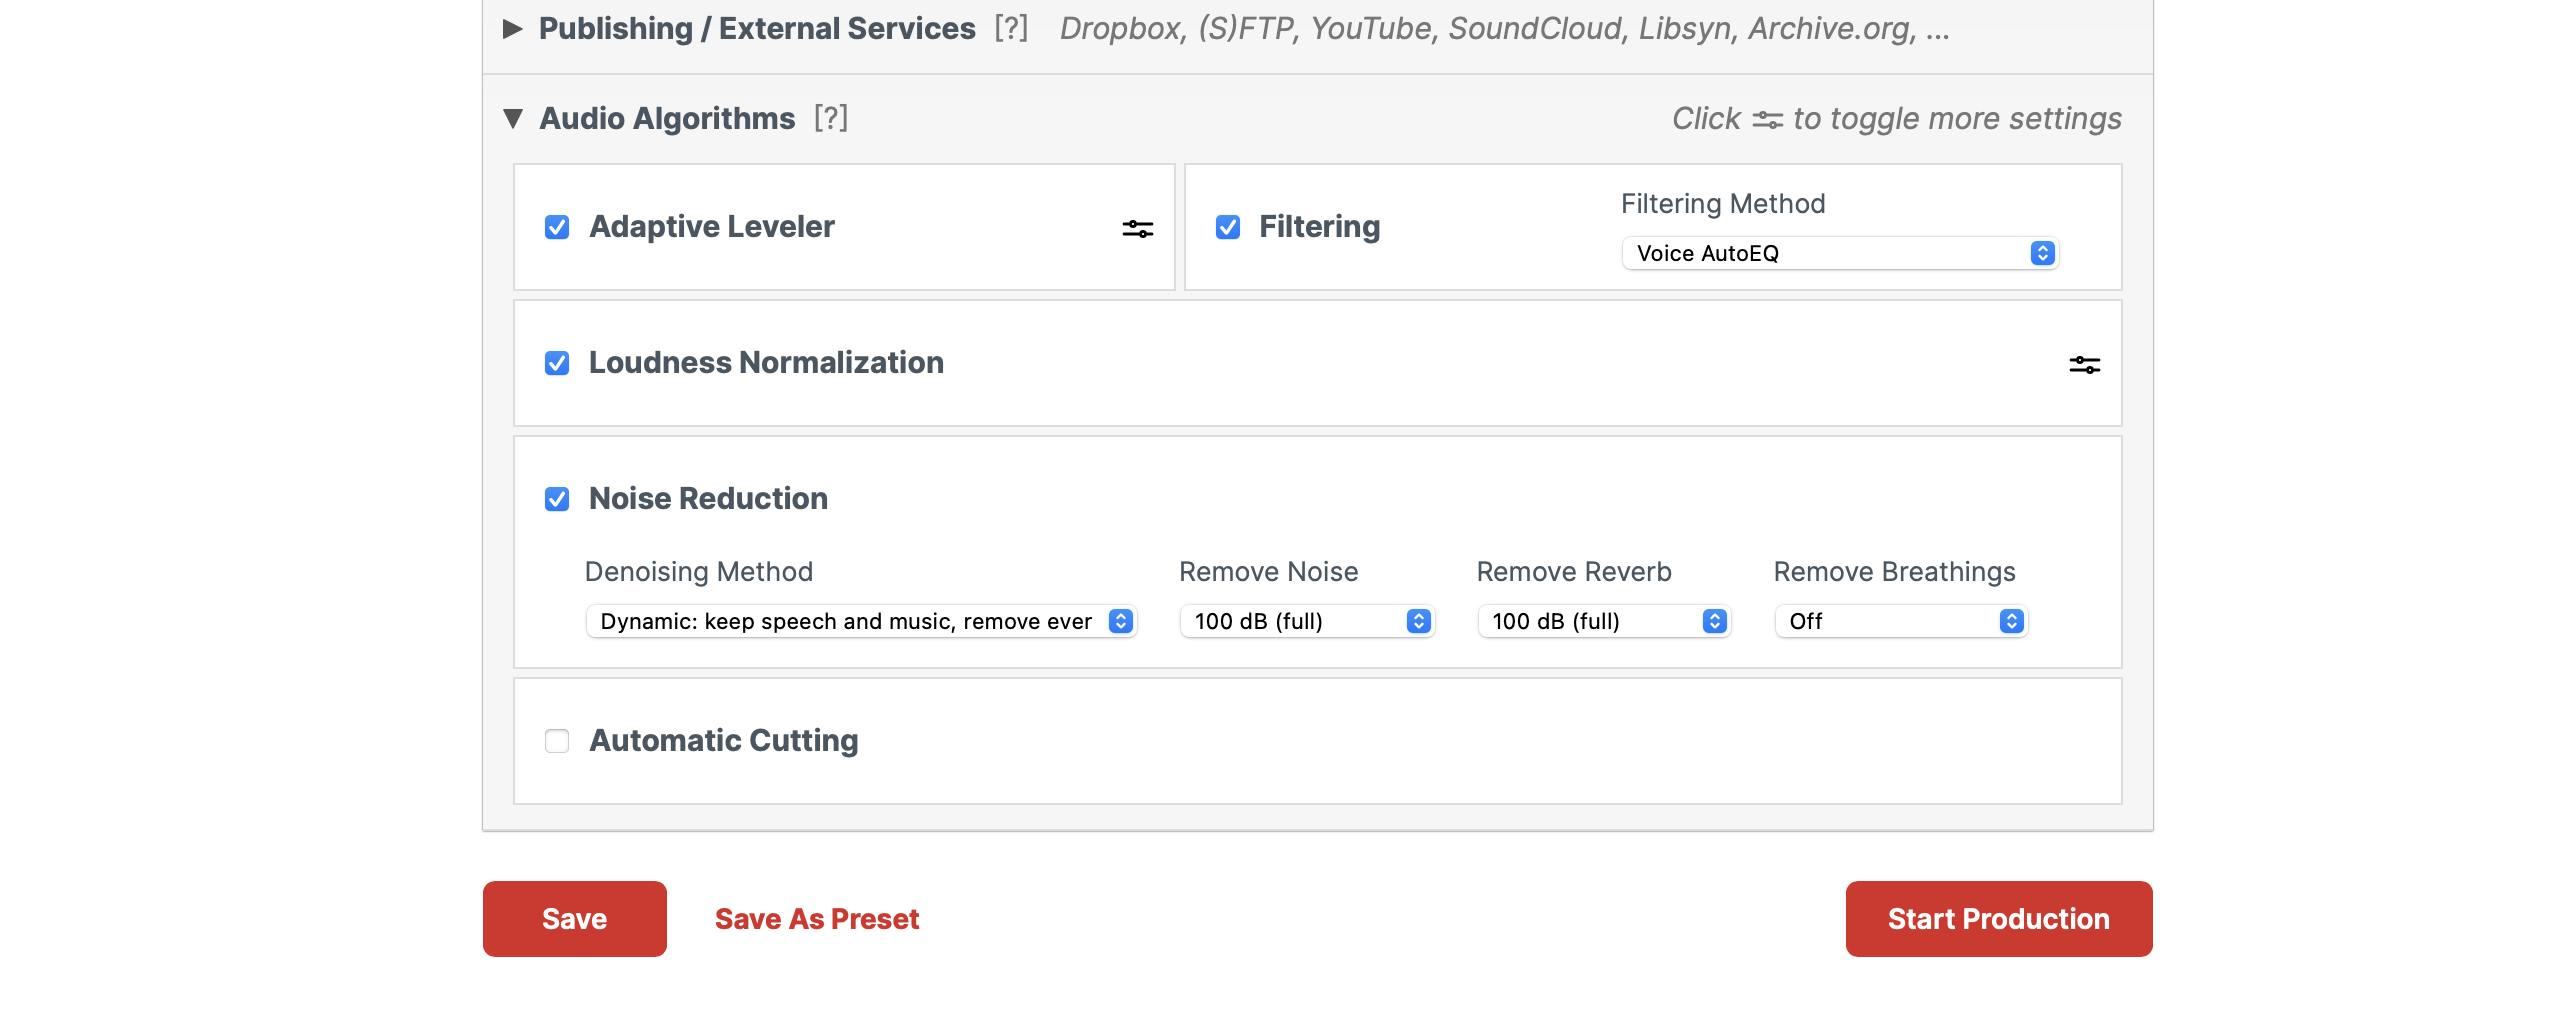
Audio Algorithms
This is the core of Auphonic's audio processing power. These features automatically adjust your audio levels and improve overall sound quality.
Adaptive Leveler
This tool balances the volume between voices, music, and transitions. Perfect for multitrack recordings or co-hosted shows. This ensures your episode volume remains consistent through the episode and that each track and segment is correctly balanced.
Loudness Normalization
Loudness Normalization adjusts the global, overall loudness to the specified Loudness Target so that all processed files have a similar average loudness. If the Adaptive Leveler ensures that your episode volume is consistent, Loudness Normalization determines how loud or soft your episode is. We recommend:
- -19 LUFS for mono
- -16 LUFS for stereo
If you’re curious why there’s a difference, Daniel J. Lewis has an in-depth blog article that explains why we perceive mono and stereo audio differently.
Filtering
The Filtering algorithm applies a high-pass filter to remove unwanted low-frequency background noise. It helps clean up rumble and mic handling noise!
Noise and Hum Reduction
Noise and Hum Reduction classifies regions with different backgrounds and automatically removes noise and hum in each region. This is especially useful if you find previously unnoticed background noise in one of your recordings.
If you use this algorithm, you’ll need to tell Auphonic how much reduction you would like with “Auto” being the default option.
We only recommend using noise reduction if there’s a noticeable noise or hum you’d like to get rid of or reduce. Otherwise, leave this unchecked.
Additional Tools
Below are brief descriptions of the other tools Auphonic provides. While we do not use them for our Buzzsprout podcasts, you may find some of them useful for your podcast workflow.
Intro and Outro
Auphonic can attach your intro and outro segments. We suggest adding these manually in your editing software like Adobe Audition for better control.
Basic Metadata and Extended Metadata
Here you can save information like Title, Artist, and Cover Image directly to your audio file. However, most podcast hosting services (like Buzzsprout) handle this for you!
Chapter Marks
This feature lets you add chapter markers to your podcast episode, making it easier for your listeners to jump to specific parts of your episode. A nice feature if you publish to YouTube or Spreaker, but Buzzsprout has a built-in Chapter Marker tool that’s more user-friendly.
Note: You can add Chapter Markers to your episodes on Buzzsprout. Choose the episode you want to add Chapter Markers to and click the link that says “Add Chapter Markers” on the right sidebar.
Speech Recognition
The Speech Recognition feature provides basic, unedited transcripts of your podcast episodes but must be paired with an existing transcript to work. It works with AI audio transcription services like Google Speech and Amazon Transcribe. However, for cleaner transcripts, we recommend using Buzzsprout’s integrated transcription tool.
Note: Did you know you can transcribe your podcast episodes within Buzzsprout? Choose the episode you want to transcribe and click the link that says “Add a Transcript” on the right sidebar to get started.
Publishing/External Services
Auphonic supports direct uploads to several podcast directories and platforms including YouTube. While this might seem convenient, we recommend manually uploading your files to ensure everything is finalized properly.
When you’re ready for Auphonic to process your audio, click “Start Production” at the bottom of the page. This will take you to a second page which displays how much processing time you have available. Click “Start Processing” to confirm and start processing.
Result Screen
After processing, Auphonic shows a visual breakdown of your audio with music and speech color-coded. Click “Show Input” to compare your original file to the optimized version. Here you can see your final waveform with color-coded segments (Blue = Speech, Yellow = Music).
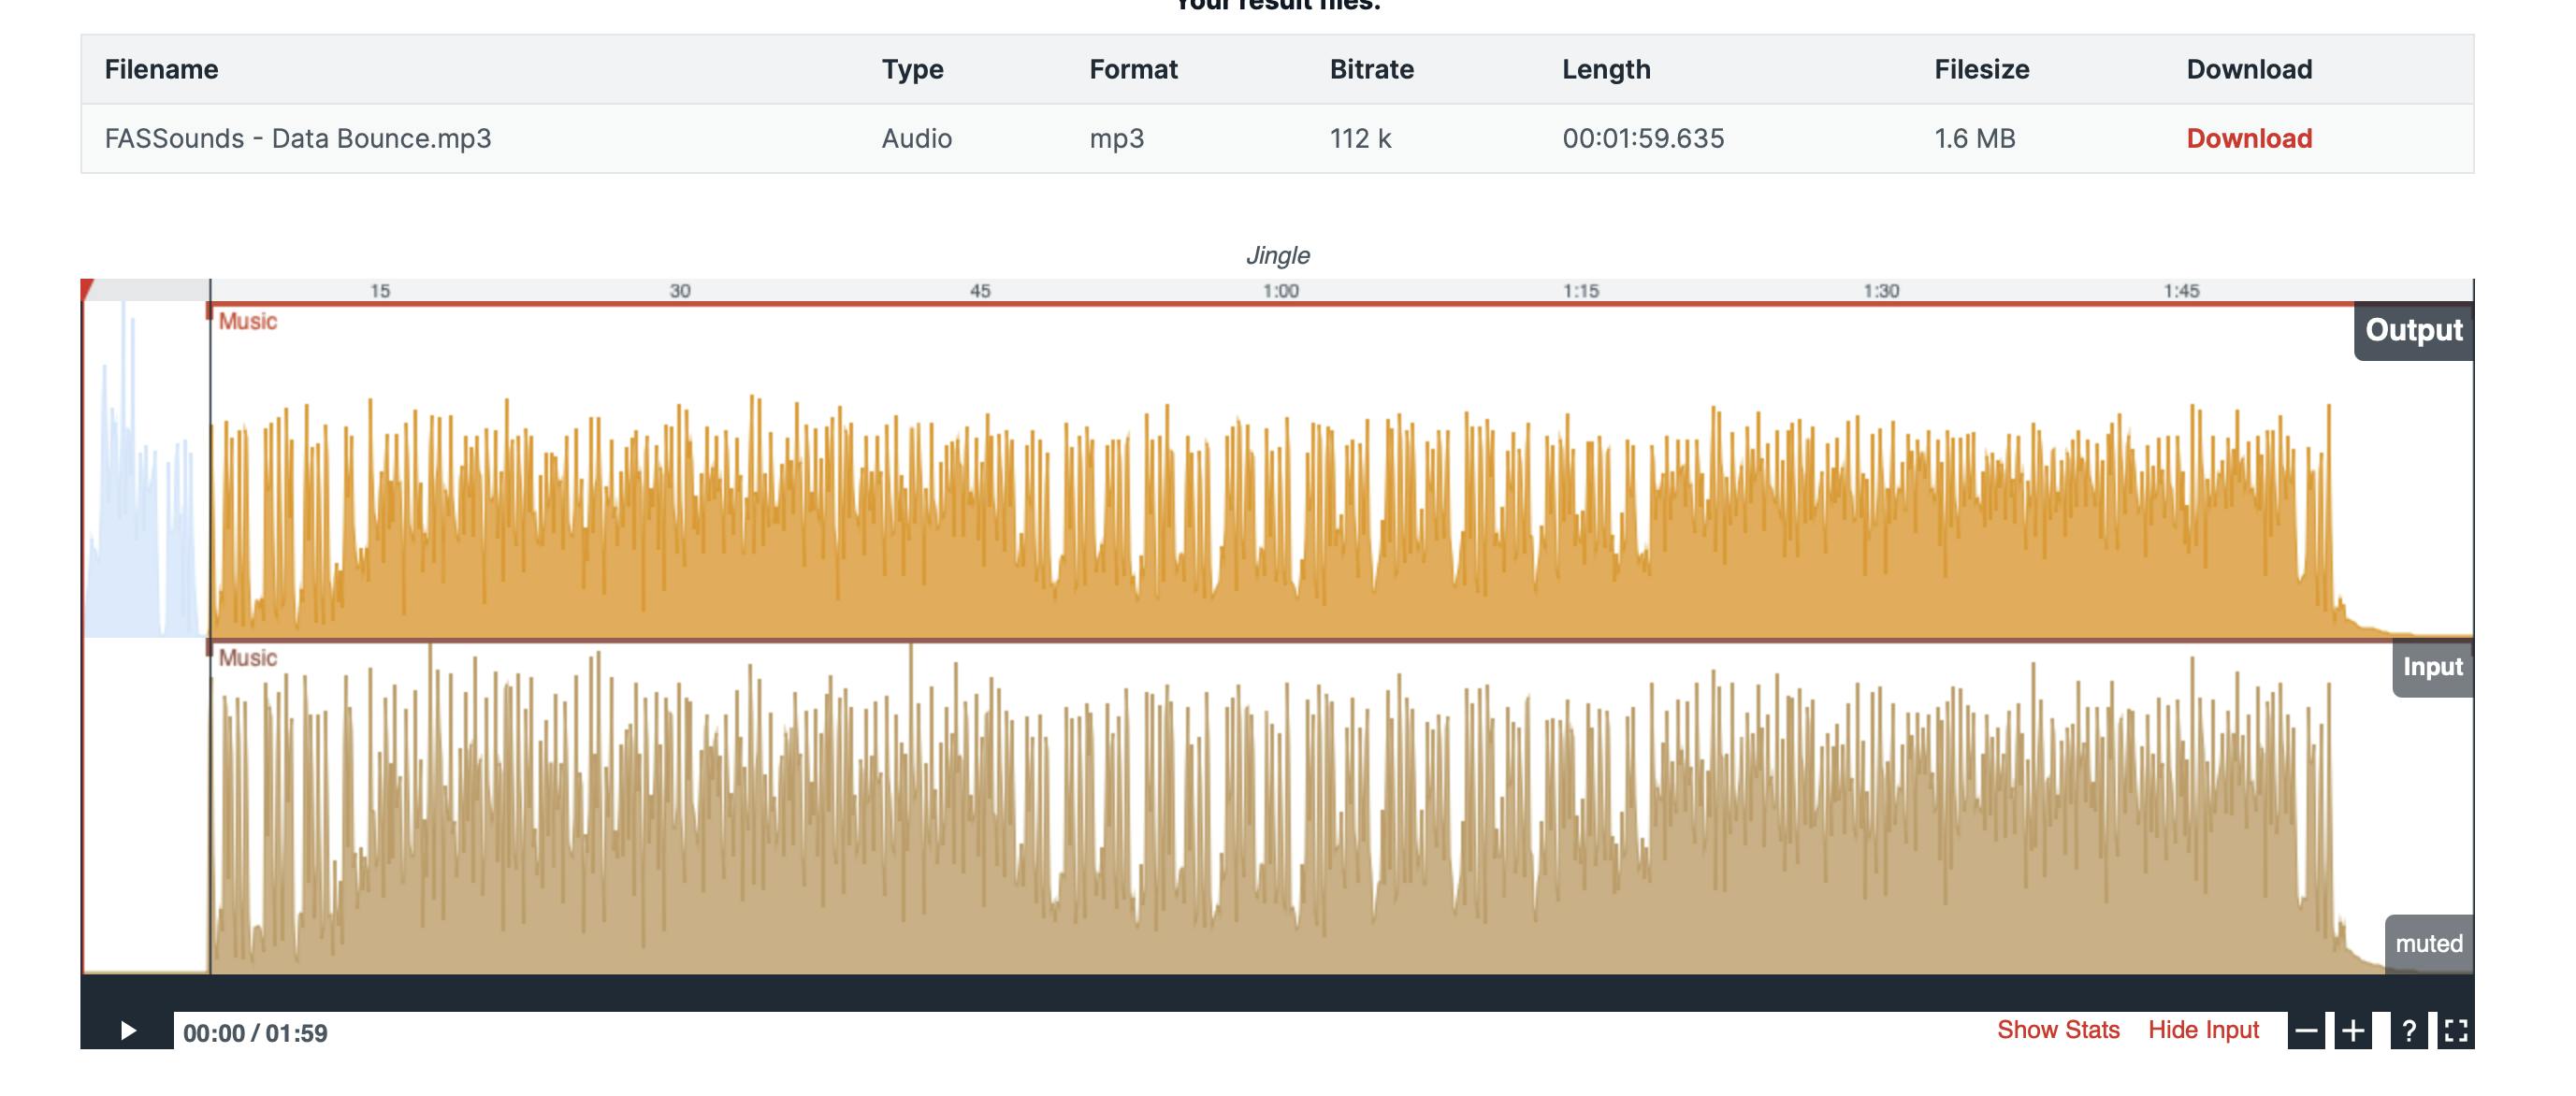
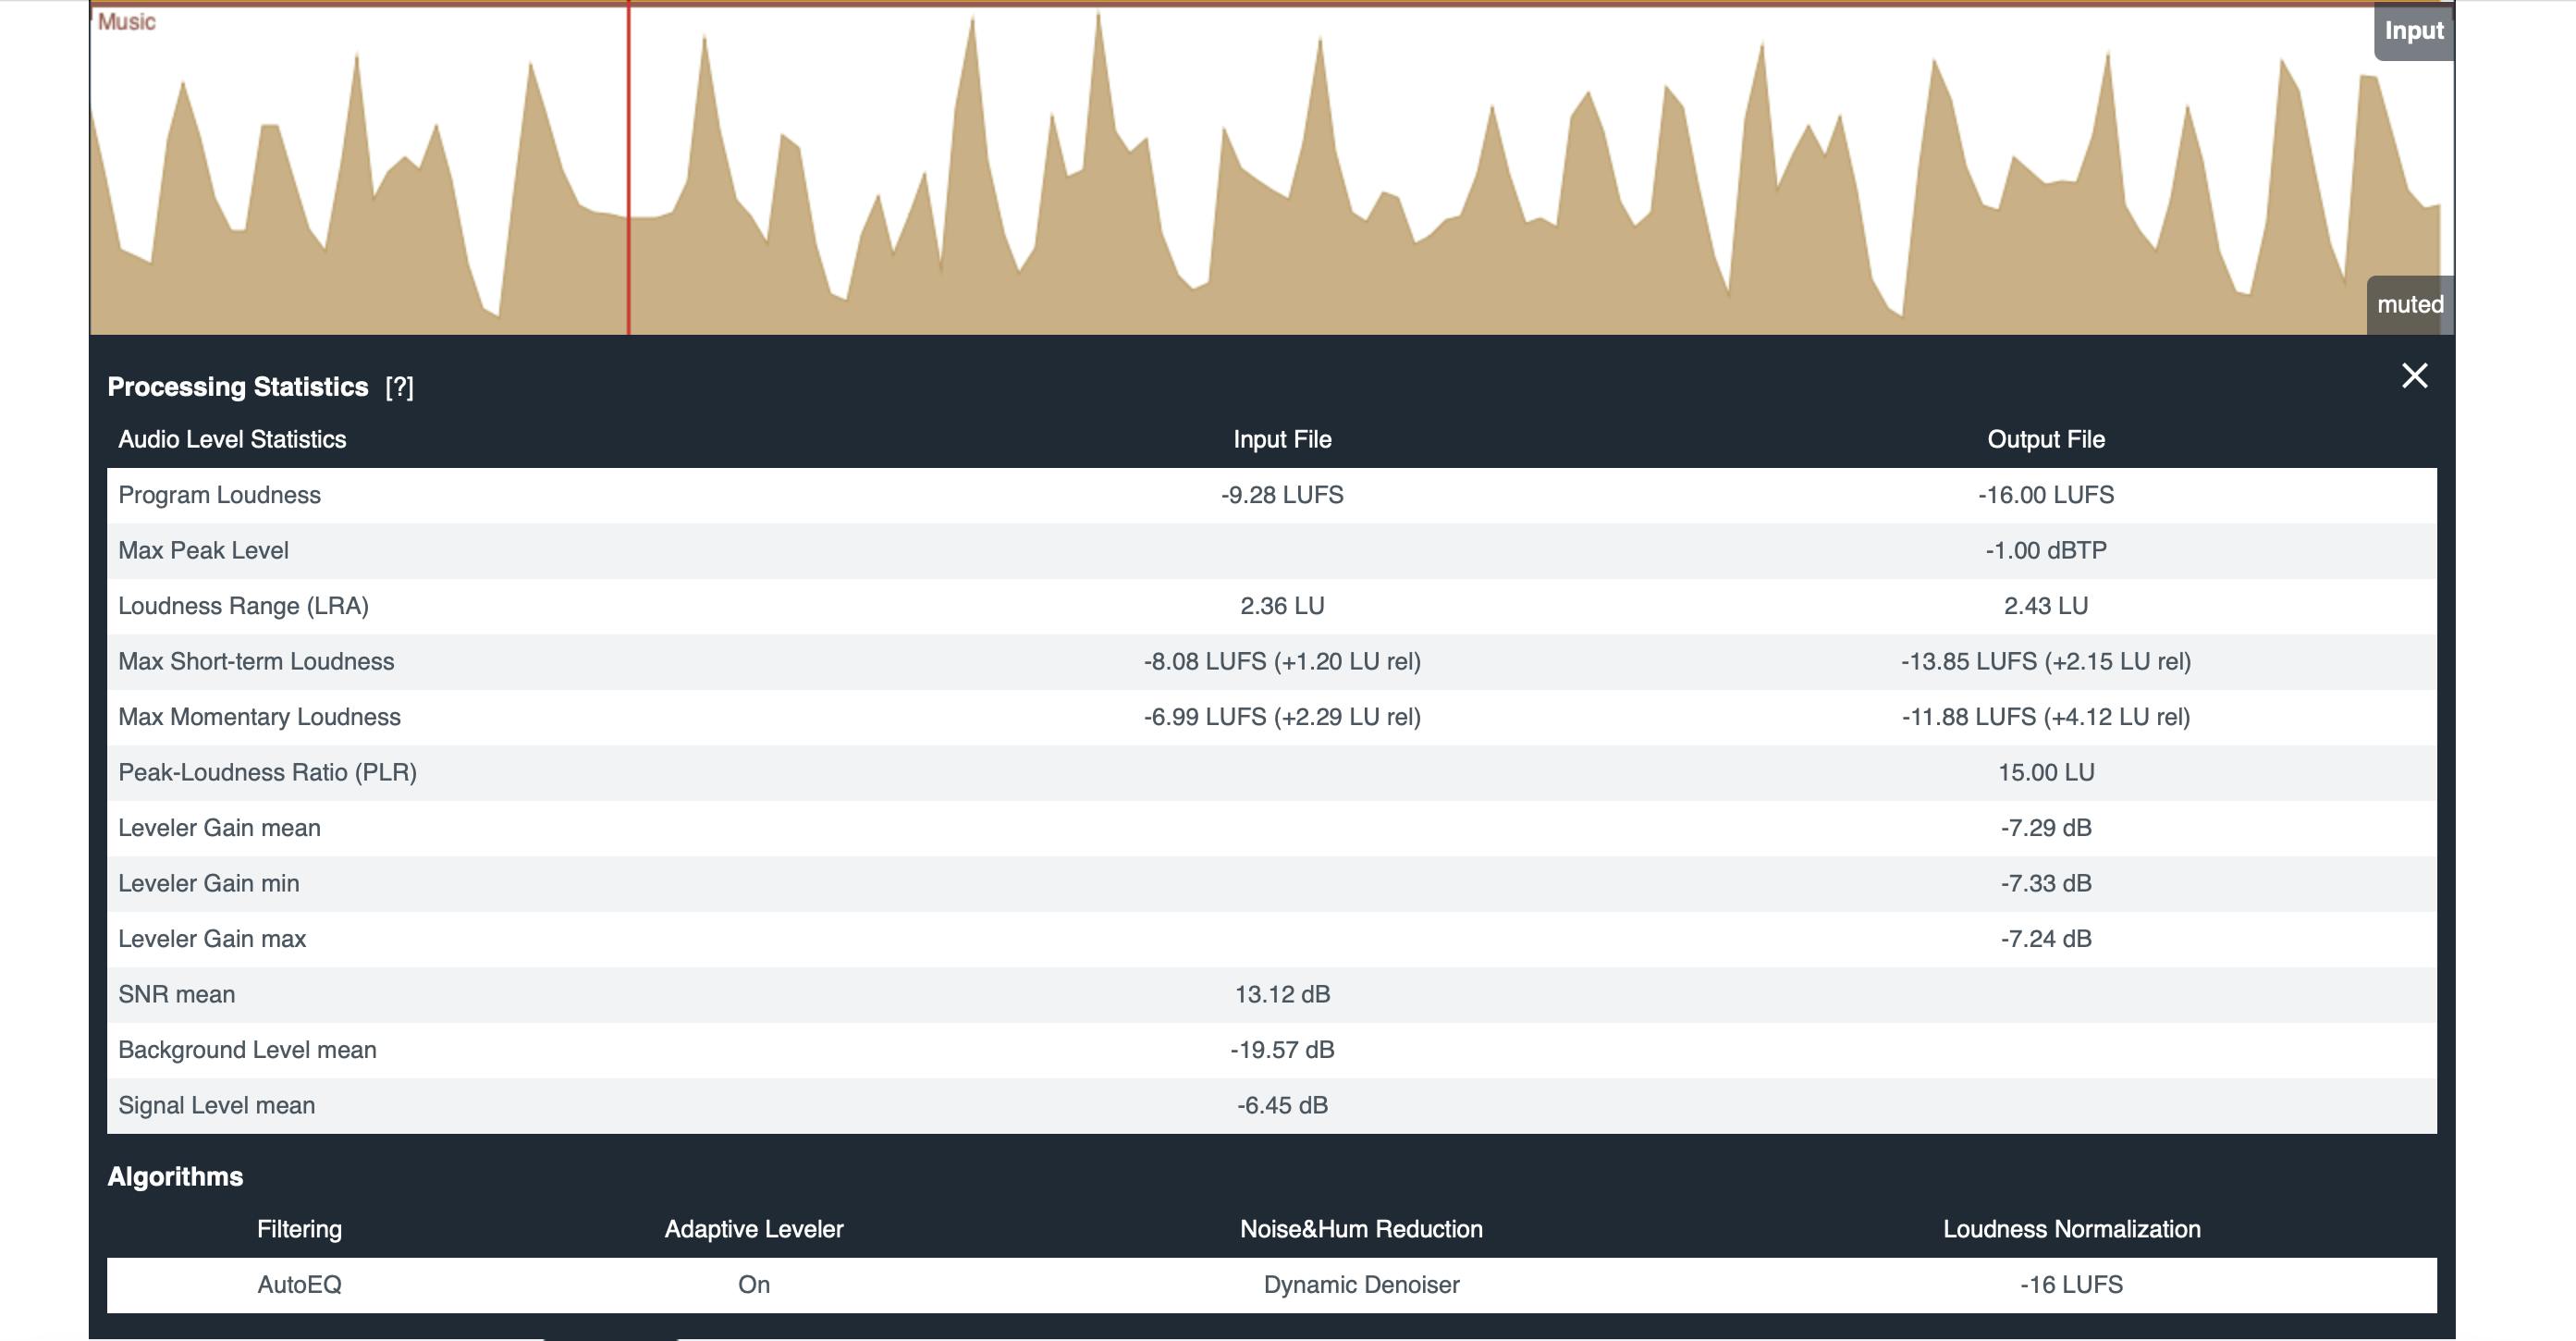
You can also check “Show Stats” to view audio enhancement metrics. If you want to fine tune settings, you can reprocess the file without using more monthly credits.
Presets
Once you know which settings you plan on using for your podcast, you can create a preset to speed the process even more. Click “Presets” in the top navigation to save your preferred settings. You can name it something like “Podcast Audio” and include all your preferred audio post-production tools. When you start a new production, just select your preset and go!
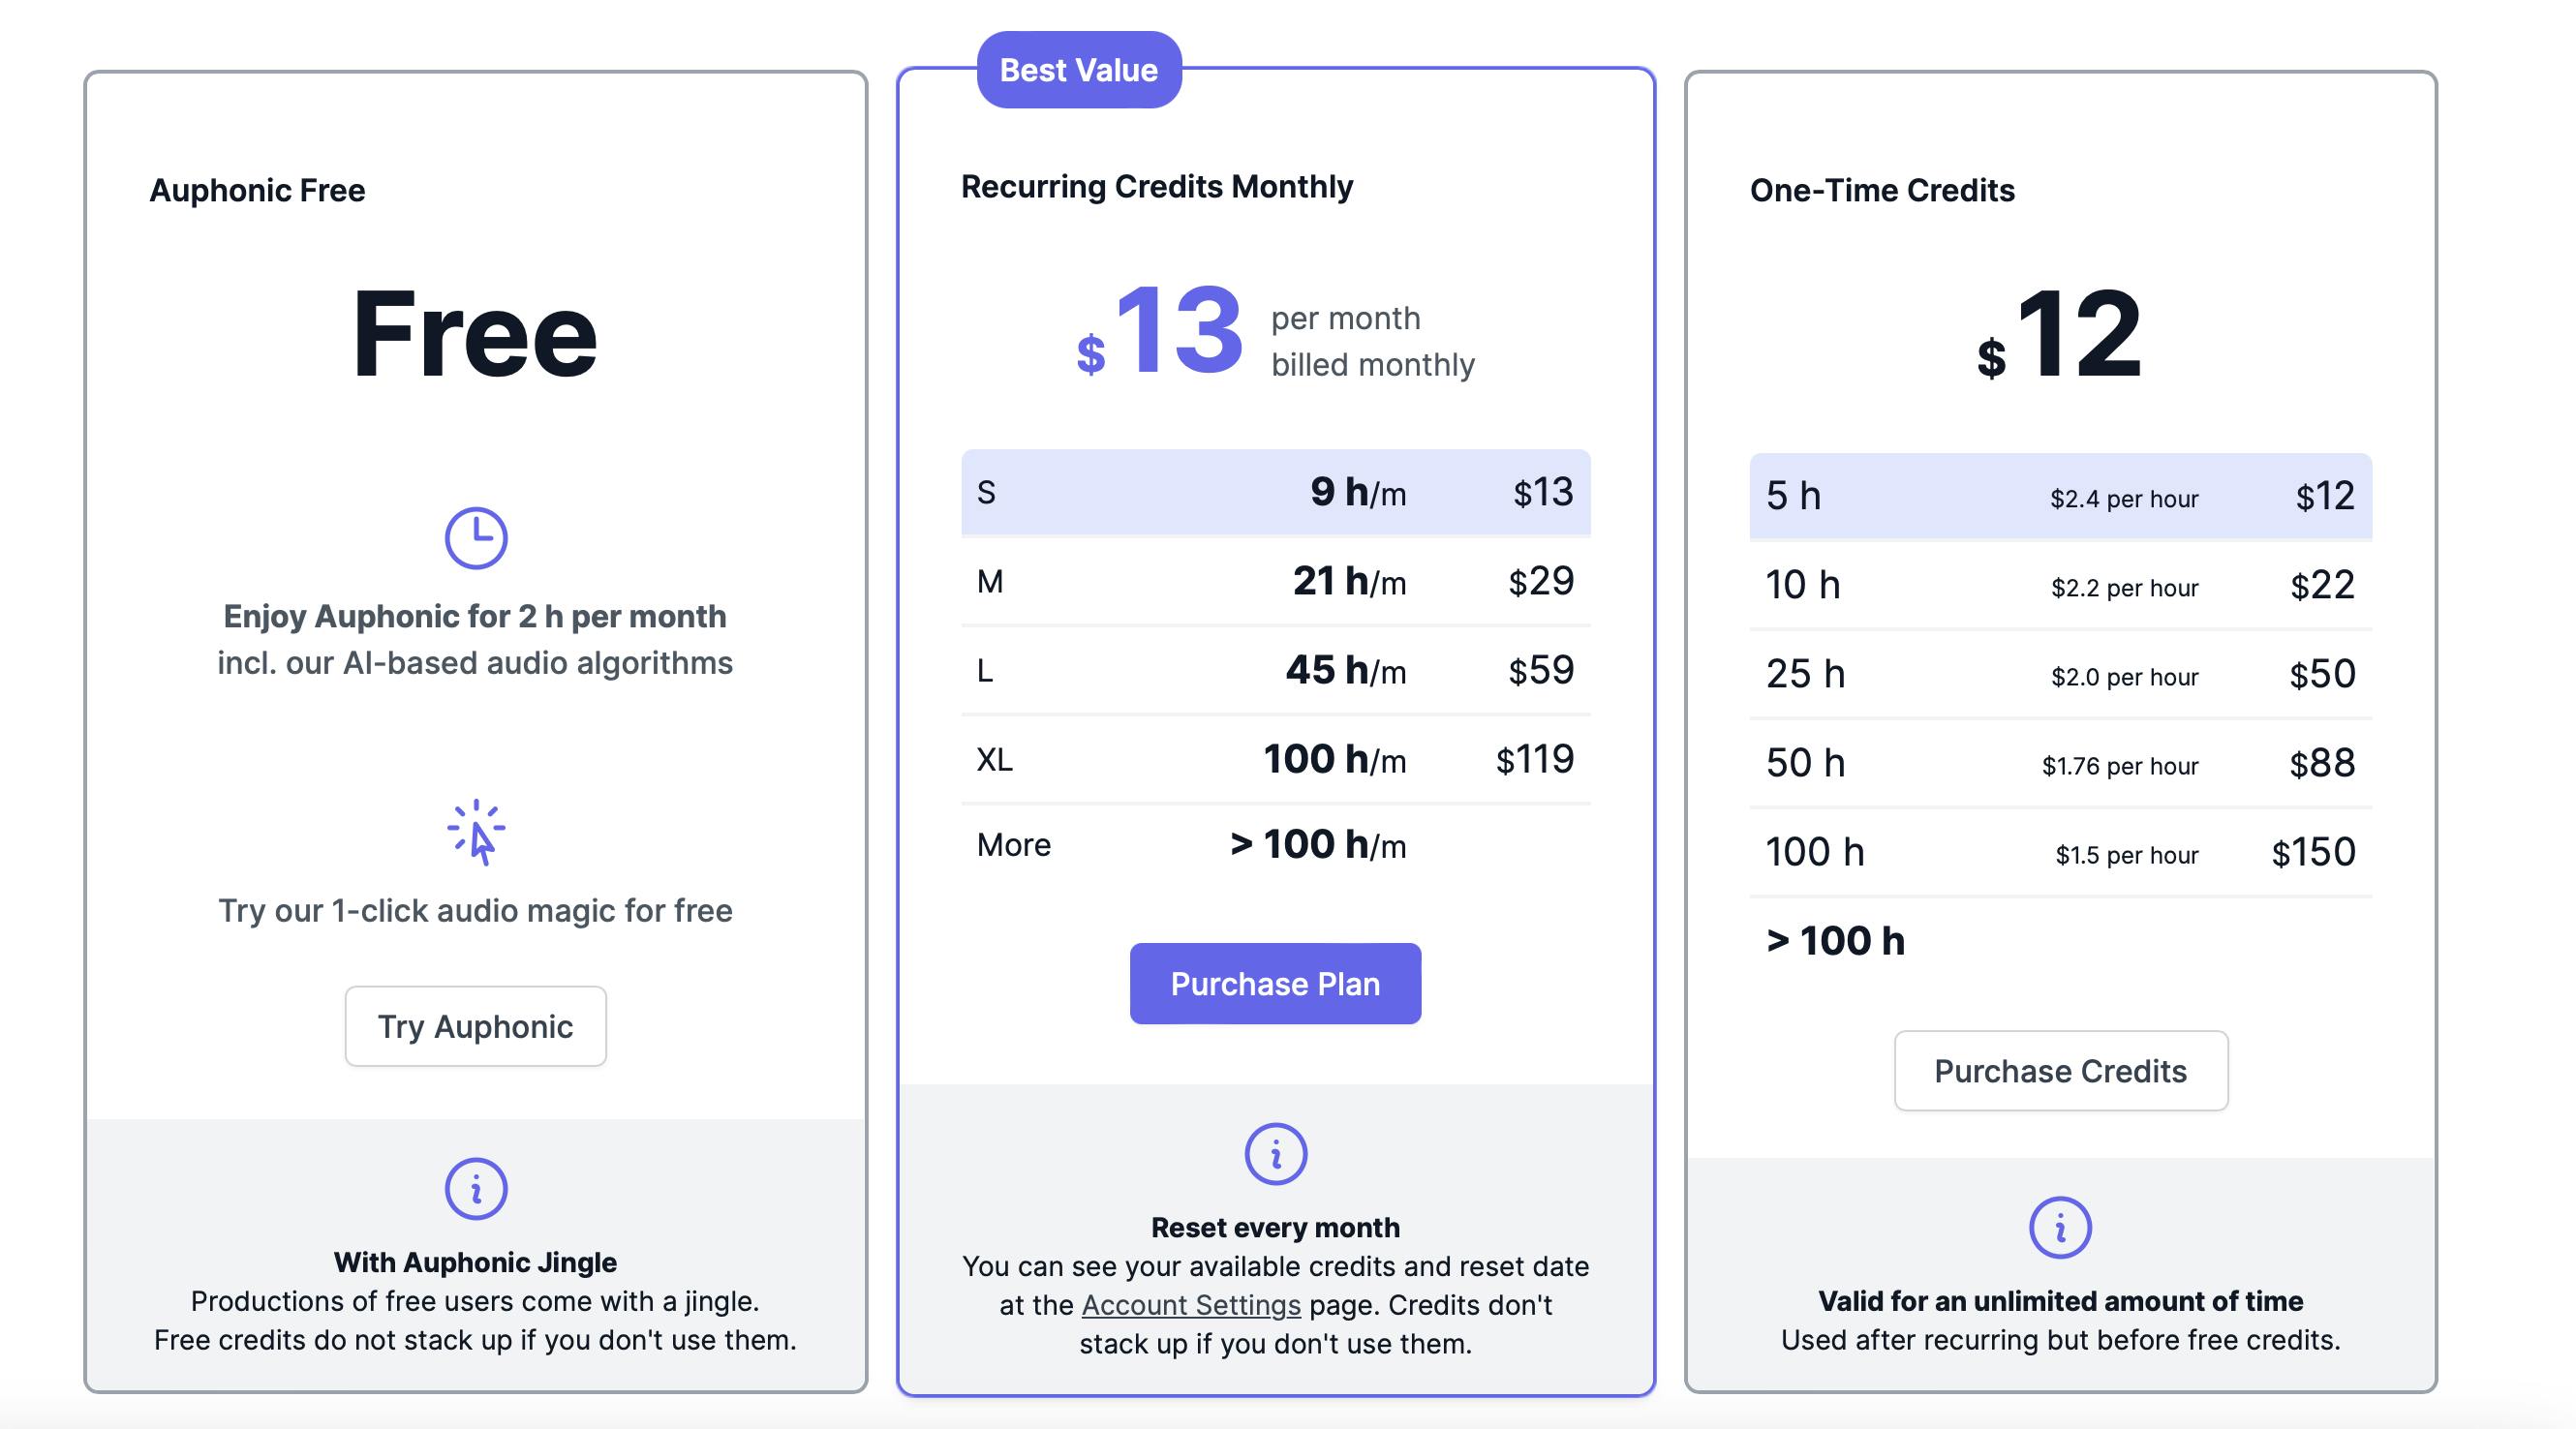
Pricing
Auphonic lets you process 2 hours of audio content for free each month. But, if you need more, they do have plan options! Podcasters can choose between:
- Recurring Credits for regular production
- One-Time Credits for flexible processing
Both options are great depending on your use cases! If you plan on processing a considerable amount of audio every month, Recurring Credits will give you a better dollar-per-hour rate. This is true even if you don’t use up all of your time each month.
Bonus: Auphonic Plugins & API
Auphonic also offers plugins and an API for deeper automation and integration into your workflow. Whether you're building a full podcast network or automating weekly uploads, these features offer serious flexibility for advanced users.
Use Magic Mastering with Buzzsprout
If you’re a Buzzsprout user, you don’t even have to log into Auphonic to get the benefits. Just turn on Magic Masteringin your account! Magic Mastering uses the same AI audio technology as Auphonic to automatically apply audio processing like noise reduction, audio enhancement, and loudness normalization every time you upload an episode. It's the easiest way to get high-quality audio without using another web service.
Final Thoughts
Auphonic is an essential AI tool for podcasters who want cleaner, more professional-sounding episodes. From audiograms to interviews, true crime to non-fiction, Auphonic helps every form of media sound its best!
With the right settings and a bit of practice, you’ll spend less time tweaking audio quality and more time focusing on what matters most: creating engaging podcast content and writing compelling show notes for your target audience.

Megan Nelson
Megan Nelson is the Content Marketing Specialist for Buzzsprout and host of "Buzzsprout Weekly."
Frequently Asked Questions
What does Auphonic do?
Auphonic is a powerful AI tool that automates audio post-production by adjusting audio levels, applying noise reduction, removing background noise, and enhancing overall sound quality.
Is Auphonic free?
Yes! You can process up to 2 hours of audio each month for free. You can also purchase more time through Recurring Credits or One-Time Credits.
How long does Auphonic take?
Auphonic typically processes files in real-time or slightly faster, depending on the length of the file and the selected settings.
How to remove breathing in Auphonic?
While Auphonic doesn’t have a specific tool for breath removal, using Noise and Hum Reduction combined with the Adaptive Leveler can minimize the audibility of breaths. For precise editing, consider doing manual edits.