
How to Record a Podcast on Zoom [Best Settings for 2022]
Over 37.1% of podcasters use Zoom to record their remote podcast interviews, but the app's default settings compress audio and tend to lessen its quality.
This guide breaks down ten steps to record a high-quality Zoom call and the settings you can use for the best results!
Step 1: Download and setup Zoom
Zoom has apps for Macs, PCs, Apple iPhone, and Android.
To download the Zoom app, go to Zoom.us, create an account and click Download.
Zoom's free version is perfect for most podcasters unless you plan on multi-person podcast recordings longer than 40 minutes.

The Pro Plan gives you up to 24 hours of group calls for up to 100 guests. It also unlocks transcriptions and cloud recording.
Step 2: Setup microphone and headphones
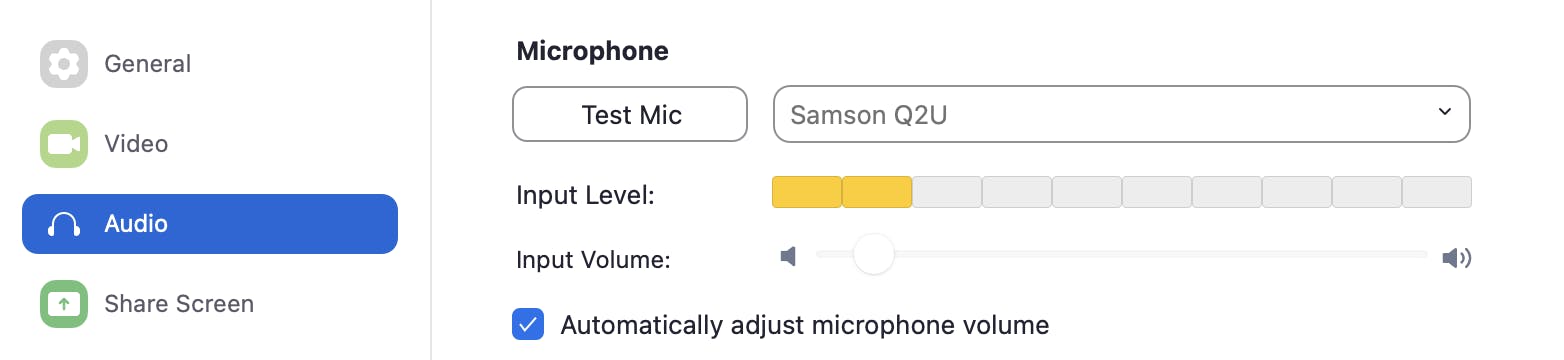
To get a quality audio recording, we suggest you invest in a USB microphone like the Samson Q2U and a pair of headphones.
To select your mic as the input, click the gear icon to open Settings. Click the Audio tab and select your mic from the pop-up menu. You should see your mic listed as an option.
Step 3: Adjust settings for best audio
Zoom compresses your audio which reduces the audio quality of the file. These audio settings can help make it better.
Open Zoom and click the gear icon on the top right of the window to open Settings.
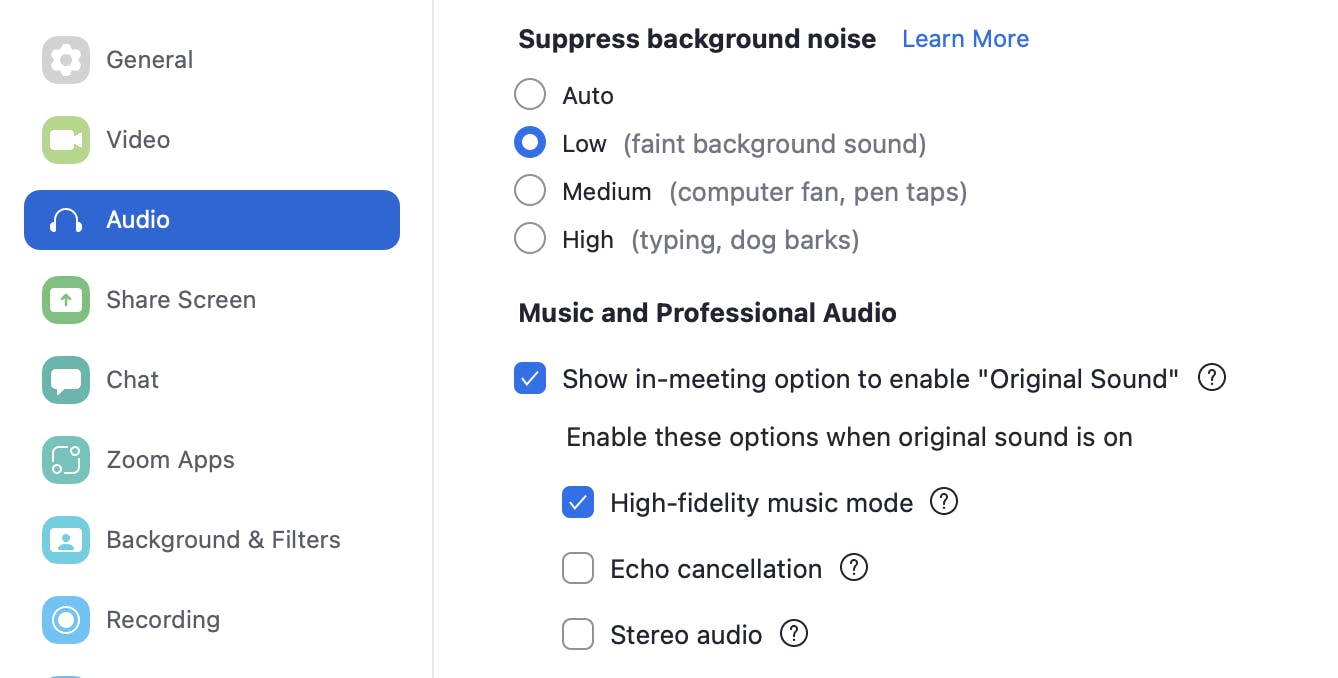
Under the Audio tab, click:
- Select Low under Suppress background noise
- Select show option to enable Original Sound
- Select High-fidelity music mode
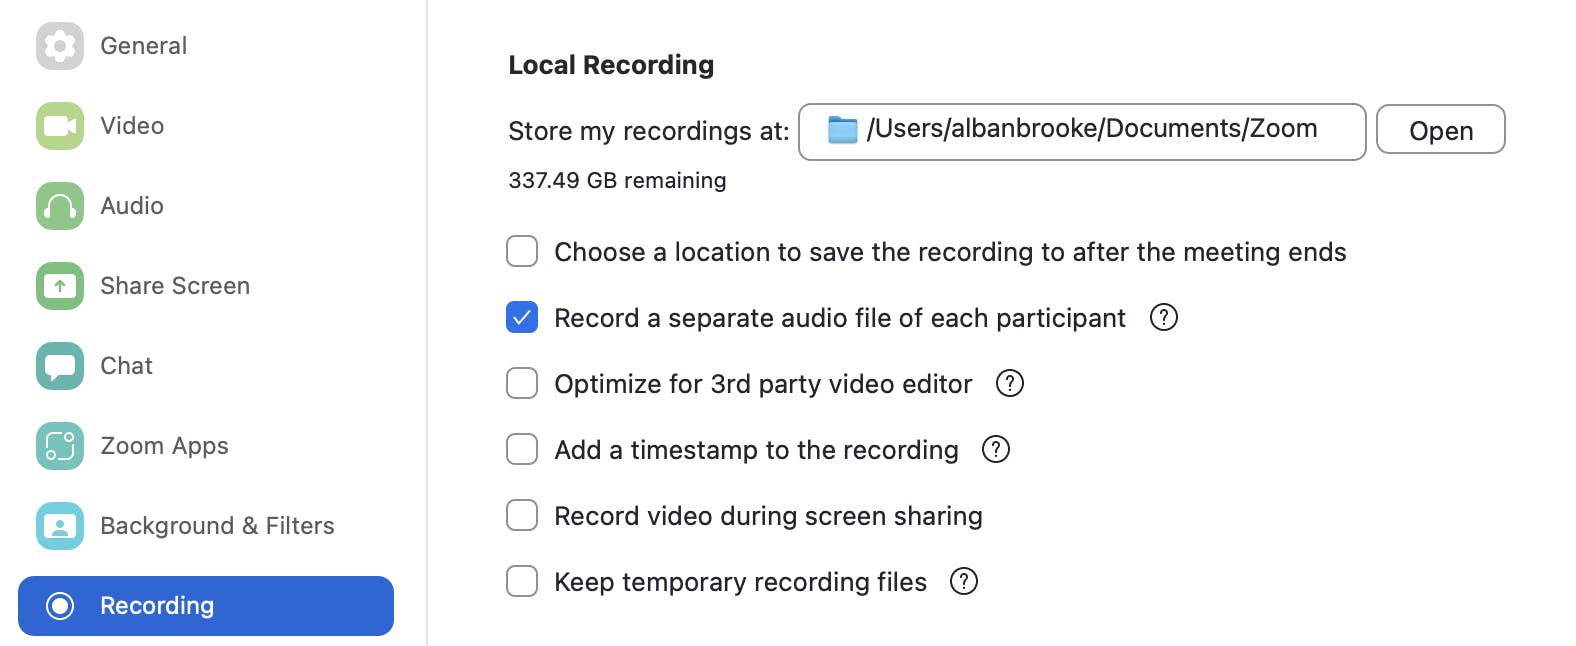
Under Recording, select Record a separate audio file of each participant.
Step 4: Optimize your recording environment
Make sure you pick a quiet place to record where you won't be disturbed.
Choose a room with minimal background noise and ideally lots of carpet and soundproofing elements to diffuse sound.

Follow best recording practices and remember to:
- check your internet connection
- double-check that your microphone is setup
- ensure your computer is plugged in or fully charged
You often only get one shot at a Zoom interview, so it's important to optimize your chances of getting it right the first go-around.
Step 5: Invite guests to the recording
To invite guests to your meeting, click New Meeting and select the arrow by the Participants icon at the bottom.
Click Invite to generate an invite link and a meeting passcode.
Copy the invite link and Zoom meeting passcode into a text or email to send to your guests or cohost.
Click the Participants button to see when your guests join the call.
Your guest does not have to download the app to accept a call. They can simply click the link and open it within their browser.
Step 6: Run pre-flight check
Preventing audio hiccups at the start is one of the best ways to get a high-quality audio recording.
Always check your webcam and internet connection before you hit record.
And if you haven't already, make sure your guest has:
- earbuds or headphones
- a quiet space to record
- a strong internet connection
Give guests a brief run-down on Zoom if they aren't familiar with it and let them know how long the interview will be.
Before you record, close all unnecessary apps. If video recording isn't necessary, turn off the feature on the bottom menu to improve your signal.
Step 7: Turn on Original Sound & click record
When you're ready to start the interview, turn on Original Sound in the top left corner.

Then press the Record.
Don't worry if you don't start right away; you can always trim up the intro in post-production.
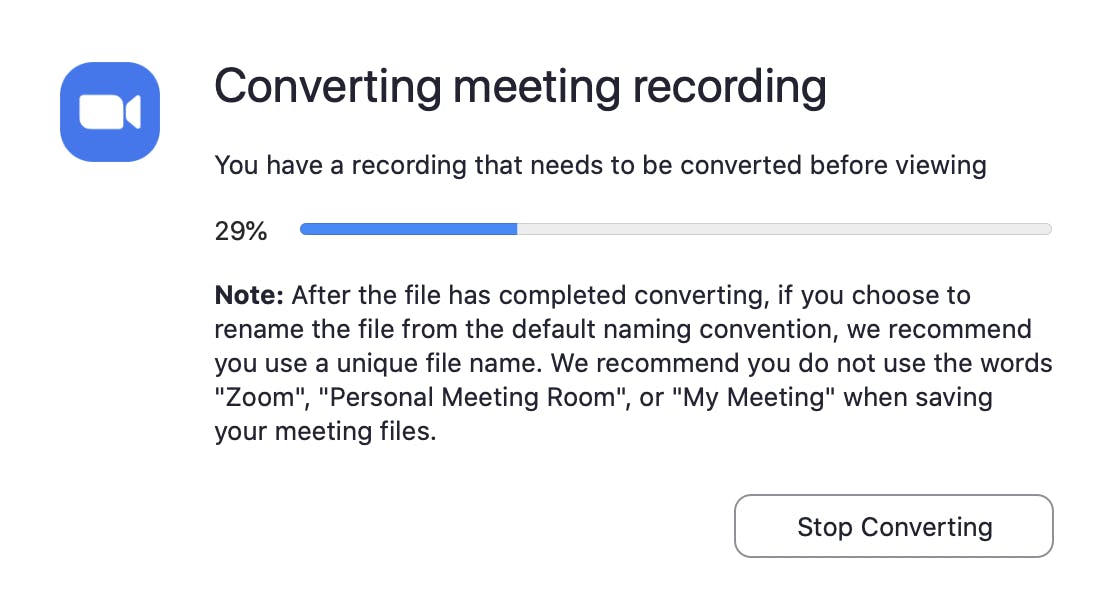
Your Zoom recording will automatically download when you hit End Meeting.
Step 8: Import files into editing software
Once the call ends, you'll get a folder with separate audio and video files.
If you have a paid account and record to the cloud, you'll also get a file with complete transcriptions of your meeting.
You can drop your M4a file directly into recording software like Audacity, GarageBand, or the audio editor of your choice.
Step 9: Edit the interview
Stack each guest's audio track on top of each other to piece together the conversation in your podcast editing software.
You can edit a podcast to include an intro, outro, transitions, and other effects.
Use the MP4 video file to create clips for YouTube or social media outlets like Twitter, Instagram, LinkedIn, etc.
Step 10: Publish your podcast episode
It's time to Publish your episode on your hosting platform.
If you use Buzzsprout, log in to your dashboard and click the Episodes tab.
Click Upload a New Episode and select your finished audio file. Fill out the episode details, hit Publish, and that's it!
Your new episode will go live immediately after publishing.
Final thoughts
While it isn't perfect, we think Zoom is the best free video conferencing option.
It's a simple layout, most people know how to use it, and your guest doesn't have to download a thing.
Just make sure to follow best practices to get good quality audio and video for your next remote interview!

Alban Brooke
Alban Brooke is the Head of Marketing at Buzzsprout and the co-host of Buzzcast. Have any questions about this guide? Reach out on Twitter.
FAQ
Can I record only audio on Zoom?
After you end a meeting, Zoom automatically converts your audio file to an audio-only M4a file and an MP4 file with audio and video. You can also click Stop Camera within a meeting to turn off your video.
What is the best way to record audio on Zoom?
The best way to record audio on Zoom is to record each guest on separate tracks. Use an external mic, make sure you have a strong wifi signal, and select Original Sound and High-fidelity music mode to optimize your recording.
How do I record a virtual podcast?
You can record a video podcast using remote recording tools like: