
How I Record Remote Podcasts (Best Tools & Settings for 2026)
I recorded my first remote podcast interview in 2014 on Skype and used Apple Earbuds as my mic. A lot has changed since then, with new remote recording tools and workflows launching almost every year.
I’ve used dozens of setups, as both the podcast host and guest, so I’ve seen it all: garbled audio, lost recordings, and even had a power outage during an interview. Fortunately, the tools have gotten better since 2014, and most of these issues can be mitigated with a bit of prep.
In this guide, I’ll cover why “a good internet connection” won’t fix everything, the best ways to record remotely, my favorite software, and the best practices that apply no matter what solution you pick.
My top recommendations
If you want a fast and simple option:
- Zoom with my recommended settings
If you want a balance of sound quality and simplicity:
- Adobe Podcast Studio for audio podcasts
- Descript for video podcasts
If your guests can only do a phone call:
- Record the call through a mixer, like the RodeCaster Pro
- Record the call on your iPhone
If you want a true professional setup:
- Record a double-ender where each person records separate tracks locally

Best Practices to improve quality on any platform
This section is mostly unchanged from when I first wrote this blog in 2021 because the fundamentals still matter.
-
Ask everybody to use a real microphone. It can be awkward, but if your guest shows up without a microphone, I’d strongly recommend asking them to find a good mic before hitting record.
Recording with AirPods, earbuds, or a gaming headset are all better options than a laptop microphone. If they don’t have one, I’d recommend a cheap USB microphone like the Samson Q2U.
-
Wear headphones. This reduces mic bleed, where your audio is recorded on your guest’s track, and it promotes good mic technique. I’ve always used wired Apple Earbuds.
-
Improve your internet connection (within reason). A better, more reliable internet connection will improve your recording by reducing latency.
- Record where you have the best internet connection
- Wired connections are better than Wifi
- Turn off streaming or other devices on your network
-
Record separate tracks (multitrack). This will improve your audio quality and speed up your podcast editing time. By recording your co-host to a separate audio file, you can:
- Remove coughs and interruptions
- Fix levels by speaker
- Improve background noise
-
Do a quick sound check for each co-host.
- Check that your audio input is your microphone, not your computer
- Ensure your levels aren’t clipping
- Position yourself ~4” from your mic
-
Record a backup in case something goes wrong. No matter how careful you are, something will eventually go wrong: your SD card fills up, your recording software fails, your internet connection flakes out, etc.
Here are a few options for backups:
- Software recording with QuickTime or Audio Hijack
- Use a Zoom or Google Meet recording as a backup
- Hardware recording (like on a Rodecaster Pro)
-
Save and transfer the files as soon as you’re done! Don’t wait to get the full wav files from your guests or co-hosts. As soon as you’re done, ask them to transfer them while you’re still on the call.
This is much easier than following up later when people are busy or forgot where they saved the files.
What problem are we solving?
The main problem is that communication tools optimize latency by compressing audio and video.
Zoom, Google Meet, Teams, etc., are all designed to seem as real-time as possible. To do that, they compress your files:
- audio is compressed, so the quality suffers
- bitrate drops when your internet connection is worse
- video frames are garbled or dropped to keep things in sync
That’s why the recordings might end up with robotic-sounding voices or dropouts, even when the interview felt good live.
How does remote podcast recording solve this?
The modern solution is to split the communication stream from the recording itself.
- You talk on a low-latency stream that is low quality, but near real-time
- You record locally at full quality
Your local recordings are uploaded continuously, which is why your uploads are often a few seconds or minutes behind once you finish the interview.
Descript, Riverside, Streamyard, Adobe Podcasts, and even double-ender recordings are using the same strategy, just with different trade-offs.
Four ways to record high-quality audio remotely
- Use video conferencing software
- Zoom ← Easiest option
- Use remote recording software
- Adobe Podcast Studio ← Best for beginners
- Descript + Squadcast ← Best for video
- StreamYard
- Riverside
- Zencastr
- Cleanfeed
- Record a phone call
- Record a Double-ender ← What I use
Option 1: Use video conferencing software
Best for: This is best for beginner podcasters or low-tech guests
Difficulty: Easiest option
Quality: Average (but can be improved with the right settings)
Zoom (Free - $17/month)
Zoom is still the easiest option for remote interviews because guests already know how to use it, and they have recording apps for Windows, Mac, iPhone, and Android.

But it has some limitations because it’s designed for meetings, so the audio is compressed and heavily processed. The free plan, while generous, limits you to 40-minute meetings, so you’re limited to short recording sessions, or you have to restart mid-interview.
Fortunately, we can improve the audio with these settings:
Zoom settings I use for podcasting

- Record separate audio files, so each person gets their own audio file. Click your profile photo → Settings → Recording → Record a separate audio file for each participant.
- Enable Original Sound for Musicians to avoid Zoom’s audio filters and echo cancellation. Click your profile photo → Settings → Audio → Scroll to Microphone modes and select Original Sound for Musicians.
- Turn on High Fidelity Music Mode to disable all processing and raise the audio codec to 48 kHz, 96 kbps mono / 192 kbps stereo. Click your profile photo → Settings → Audio → Scroll to Microphone modes and select High-fidelity music mode.
PRO TIP
These settings will use more bandwidth, so if your internet is struggling, turn off your video during the recording.
Avoid Microsoft Teams, Google Meet, and Skype
All three of these have the same limitations because they’re for meetings, not recording: they’re heavily processed, compressed, and often give you a single track. They’re worse than Zoom because they don’t allow you to customize the controls to get a higher-quality recording.
I’d only use these as a last resort.
Option 2: Use remote recording software
Best for: Simple high-quality remote audio or video recordings
Difficulty: Moderate
Quality: Nearly studio-quality
This category has improved the most since we first wrote this guide in 2019. Each of these platforms have local recordings, progressive uploads, and saves multitrack isolated files.
Adobe Podcasts - Best for beginners (Free - $10/month)
I did a presentation with Adobe Podcasts at Podcast Movement last year, and was shocked to see how much it had improved over the past two years. It’s quickly become my go-to recommendation for new podcasters.

Adobe Podcasts lets you send a link to remote guests, and you record your podcast in the browser. It will save your audio locally as a high-quality WAV, then upload it into their editing software.
On the editing side, Adobe Podcasts uses a transcription, so you edit your podcast like it’s a Word document. Then the complete transcript will make writing your show notes much easier.

Finally, Adobe Podcasts makes it easy to create promo materials so you can market your podcast on social media.
Part of what makes Adobe Podcasts perfect for beginners (simple UI, streamlined features), makes it a bad pick for professional creators. It doesn’t record remote video, it lacks a lot of pro-level editing and post-production workflows. If you want those features, I’d recommend a more advanced recording platform.
Descript + Squadcast - Best for video ($24/month)
Descript acquired Squadcast in 2023 and has renamed it as Descript Rooms. Combining these tools makes for a nice workflow—once your remote recording is done, you can edit it in Descript.

Descript Rooms supports audio and video recordings up to 4k and it continuously uploads local files in the background.
As far as I know, Descript pioneered the concept of editing audio as a Word document. But they’ve continued to add professional audio editing tools. Descript has been used by This American Life and The New York Times to record and edit their podcast episodes.
Like many of these tools, Descript has some great tools to create marketing materials for your podcast.
The downside for Descript is that it has a much steeper learning curve for new podcasters and it’s apps are quite a bit slower than something like Adobe Podcasts.
StreamYard ($45/month)
Many podcasters use StreamYard to record audio, but it’s best suited for live-streaming:
- Designed for live shows with guests
- Streams to multiple locations at once like YouTube, Facebook, X, and LinkedIn
- Include video overlays to match your branding
StreamYard doesn’t share its pricing on its sign-up page, but it was $45/month when we used it to run our new podcaster orientations and live-streams for Buzzsprout. Your plan might vary since we didn’t use it as podcast recording software.
Riverside ($29/month)
Riverside sits somewhere between Adobe Podcasts and Descript. It runs in your browser, which is convenient, but its editing tools are a bit limited compared to Descript.

Riverside supports full 4k video recording, includes podcast editing tools, video exports for Spotify, and offers Magic Clips for creating excellent short-form clips.
PRO TIP
If you use Riverside, make sure that everybody has headphones and that noise cancellation is turned off at the start of every recording. If you don’t, your local recordings will include audio processing.
Zencastr (Free - $30/month)
Zencastr is a solid pick if you want an all-in-one remote recording workflow. They launched shortly after I started podcasting in 2014, so they’re one of the most battle-tested options. They have some nice cleanup tools, like their filler-word and pause removal.

I’ve only ever used Zencastr for audio recordings, but they do offer up to 4k video recordings on their $30 plan. Their free plan only saves your video files for 90 days.
Cleanfeed ($36/month)
Cleanfeed was originally created for radio and broadcast to get the best audio recording possible. They’re used by voice actors and audio production professionals who want an audio-first recording studio.

They’re often touted as a simple and an easy-to-use option, but I found it frustrating when using Cleanfeed to record my podcasts. I consider myself very tech-savvy, but it took my co-host and me a good 15 minutes to figure out what half the buttons did because they label each button’s function.
Option 3: Record a phone call
Best for: Low-tech guests or for recording that sounds like a phone call
Difficulty: Very easy for a guest
Quality: Lowest (but sometimes that’s the point)
If you listen to documentary podcasts with lots of interviews, you’ll hear a lot of podcast guests who call in with a phone or are captured in person with a voice recorder. The audio isn’t great, but it gives the podcast a bit more raw, authentic feel.
Record through a mixer
If you have a mixer, like a RodeCaster, you can record the phone call through the board and use mix-minus. Mix-minus lets the caller hear everything, except their own voice, so you don’t get echo or feedback.
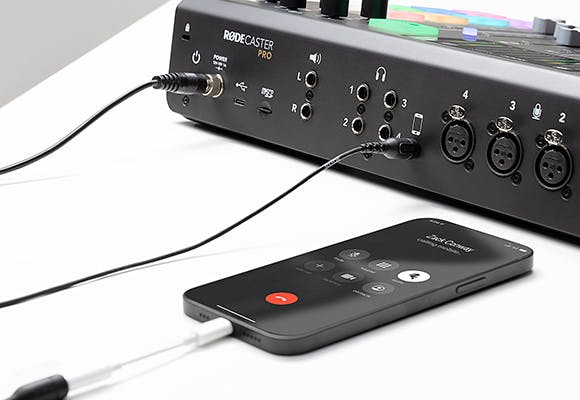
iPhone call recording
Apple now has a built-in iPhone call recording feature and it will save the recording and transcript of the call to your Notes app. It is broadly supported, but remains unavailable in a few countries.
- Call somebody with your iPhone
- Ask if they’re okay with you recording the conversation
- Click … and tap Call Recording
- Then click Stop or hang up the call
- The recording and transcript will be saved to your notes app.
Option 4: Record a Double-ender
Best for: Professional sound quality on a budget
Difficulty: Hard
Quality: Studio-quality
A double-ender is still the gold standard because your final audio is not dependent on the internet or browser-based recording software.
We record a double-ender (or triple-ender) for Buzzcast, but it’s complicated for new podcasters because each guest or co-host has to record their own audio locally.
I also don’t think double-enders are a great option for video podcasters because it’s a lot to ask people to record their own video. If you go this route, I’d recommend finding a local recording studio so they have a engineer there in person to help.
My double-ender setup
- Start a call on Google Meet so I can see my cohosts (you can use any tool you want)
- Start our local recording. We all use Rodecasters, so we use a hardware recorder, but you could also record on Audacity or QuickTime.
- Say “I’m hitting record now” and everybody confirms they’re recording.
- Place a sync marker. One person counts down “3… 2… 1…” then we all clap together so we can sync up the audio files when editing.
- Record the interview
- Save the recordings as lossless WAV files
- Send files to our editor on Basecamp (you’ll probably use Dropbox or Google Drive)
PRO TIP
Run a backup recording when recording a double-ender to prevent a disaster. You can do this in Zoom or whatever tool you use to see your cohosts.
Closing thoughts
If there’s one thing you take away from this guide, I’d like it to be this: don’t let audio quality be the reason you don’t start podcasting. Publishing a quality podcast episode beats chasing perfection.
Tim Ferriss used Skype to record his podcast early on and cautioned new podcasters not to overthink audio quality: “Audio engineers will never be fully satisfied with your audio, but 99.9% of listeners will be happy if you’re intelligible and loud enough.”
Most people create a quality podcast by consistently iterating and growing. Keep Podcasting!

Alban Brooke
Alban Brooke is the Head of Marketing at Buzzsprout and the co-host of Buzzcast. He has recorded over 500 podcast episodes in his ten years in the podcasting industry, and has created multiple resources on How to Start a Podcast.
FAQs
How do I record a remote podcast?
You can record a remote podcast in one of four ways, depending on your preference and the kind of equipment you and your guest have.
- Video conferencing software like Zoom
- Remote recording software (includes 4K video)
- Record the call via a mixer
- Record a double-ender
Is Zoom good for recording podcasts?
Zoom is a great, free way to record remote podcast interviews, but it compresses your audio file and reduces its overall quality. For better quality, use a remote recording tool Adobe Podcasts or Descript.
How can I record a remote podcast for free?
There are two ways to record a remote podcast for free:
- Use a video conferencing tool. Zoom lets you record meetings for free for up to 40 minutes. If you run out of time, just send your guest a new link.
- Record a double-ender. Each party records themselves and sends the files to the podcaster for post-production.
How do you record a podcast remotely and get it right the first time?
To get a quality recording, ensure your guest has a charged computer, working equipment, a quiet recording space, and a strong internet connection. These precautions should eliminate the most common hiccups found in remote interviews.