Audacity Tutorial for Podcasters: How to Setup, Record, and Edit a Podcast
Starting a podcast can feel overwhelming, especially when you start trying to figure out what audio gear to use. Mics, preamps, interfaces, digital audio workstations (DAWs), and the like are all essential parts of the process, but your investment in these tools can add up quickly.
The good news is that the first – and potentially only – audio editing software you need doesn't have to cost anything at all. The open-source, cross-platform Audacity has long been celebrated for its quality sound, ease of use, and full feature set. It's a great option for beginners, and perhaps best of all? It's totally free and available on both Windows and Apple's OS X operating systems.
Whether you want to get your feet wet in podcasting, aren't yet sure what your software needs may be, or are looking to keep your setup costs down, Audacity is an excellent choice for recording, editing, podcast editing, and mixing your own podcast. And like many podcasters, you may find it suits your needs for the long haul.
Here's a step-by-step guide with everything you need to know to get up and running.
Disclosure: Some of these links are affiliate links, which means Buzzsprout might receive a small commission if you decide to purchase an item we recommend in this guide.
Step 1 - Setup
Audacity is available for both Windows and Mac devices, so to start, download Audacity onto whatever device you’re using! When you first open Audacity you'll see a set of toolbars at the top, including Transport (Play, Stop, etc.), Tools, and Volume/Meters for microphone input and playback.

If you're missing a toolbar or would like to customize which toolbars are visible, select View > Toolbars and check/uncheck from the menu as you like. You can also rearrange the toolbar order using the "Grabber" column at the left end of each, or resize a given toolbar using the "Drag Bar" column at the right end.
Pro Tip: Using the Drag Bar to lengthen Microphone or Playback Volume controls can create more space to make granular slider adjustments.
The Device Toolbar
Next, you'll see the Audacity Device Toolbar, where you can make routing selections from a handful of dropdown menus. From left to right, you can choose your audio host, recording device, recording channels, and playback device.

If you're using Audacity with MacOS, Core Audio will be your only choice for Audio Host. On Windows, there are a handful of options, but the default MME is most compatible with all audio devices.
From the Recording Device menu, choose your connected audio interface, such as the Scarlett 2i2, or if you're using a USB mic like the Audio-Technica ATR2100 select it here.
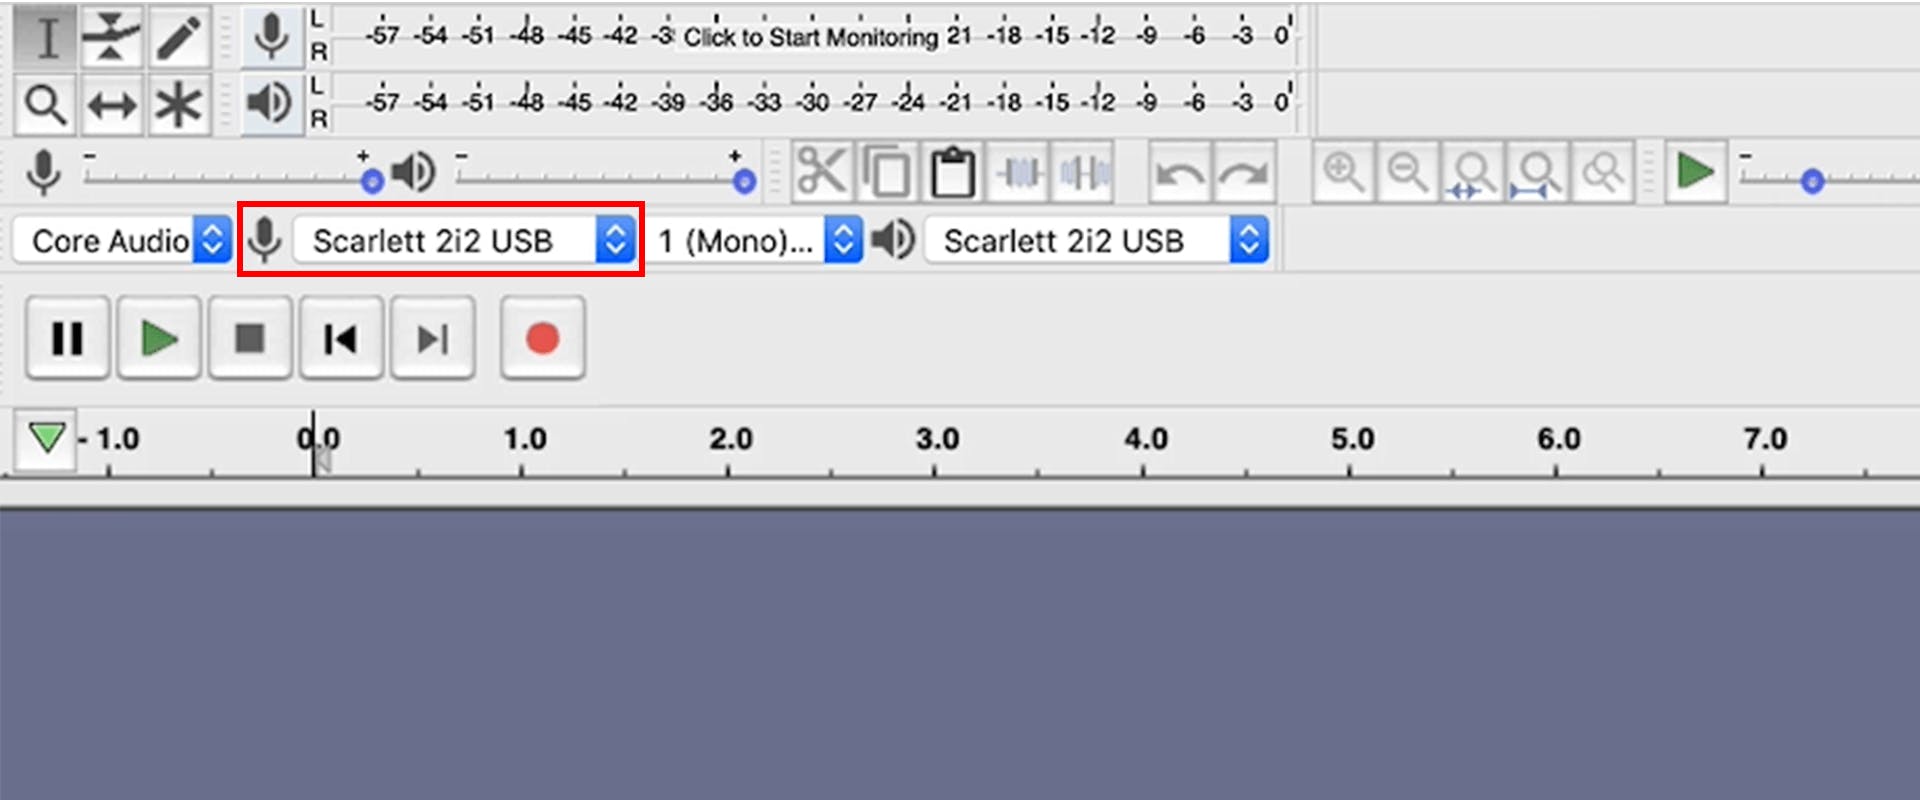
If your interface or mic is not available from the dropdown, a few troubleshooting steps include making sure your mic/interface is plugged in and turned on and checking your computer system preferences to verify that your interface/mic is connected and selected. If those steps check out, closing and restarting Audacity can sometimes jog its memory. You can also consult Audacity's extensive manual for further help.
If you're recording one microphone, choose 1 (Mono) Recording Channel from the Recording Channels dropdown. In the case of a two-person interview, you'll select 2 (Stereo) Recording Channels. Note: even though Audacity offers up to 14 recording channels from the dropdown, you can only record as many channels as you have available on your interface/mixer/etc. More on this below.
Lastly, select your Playback Device, which tells Audacity where to play the audio from your session. This selection may vary depending on whether you're recording or editing. When recording, you should monitor through headphones rather than speakers to avoid creating a feedback loop or causing bleed – and to give you immediate awareness of how you may need to adjust your mic technique. When editing, you may prefer to listen on monitors, in which case you may need to alter your playback device.
Test Your Input
The final step before you begin recording is to test your microphone. With your Recording Device selected, reference the microphone meter and, if necessary, select the 'Click to Start Monitoring' button.

With the meter engaged, begin speaking at a comfortable level and increase or decrease the Microphone Volume slider so that it registers peaks around -12dB. This should leave adequate headroom to help you avoid clipping your input signal.

Once you set your input level, you're ready to record.
Recording
Unlike some audio editors or DAWs, Audacity will automatically create high-quality tracks for each selected Recording Channel once you begin recording. Press the red Record button in the Transport toolbar (or keyboard shortcut R) to begin your audio recording.

When you're ready to end the recording, press the spacebar.
Multi-track Recording
Two Tracks
If you're recording two microphones at once, like we're doing here with the Scarlett 2i2, you'll select 2 (Stereo) Recording Channels from the recording channels toolbar. This will record both channels into a single stereo file, with input 1 on the left channel and input 2 on the right channel.

Once you're finished recording, you'll need to split the stereo file into a pair of mono files for editing and mixdown. Click the down arrow next to the track name and select "Split Stereo to Mono." Each resulting file will now be on its own track.
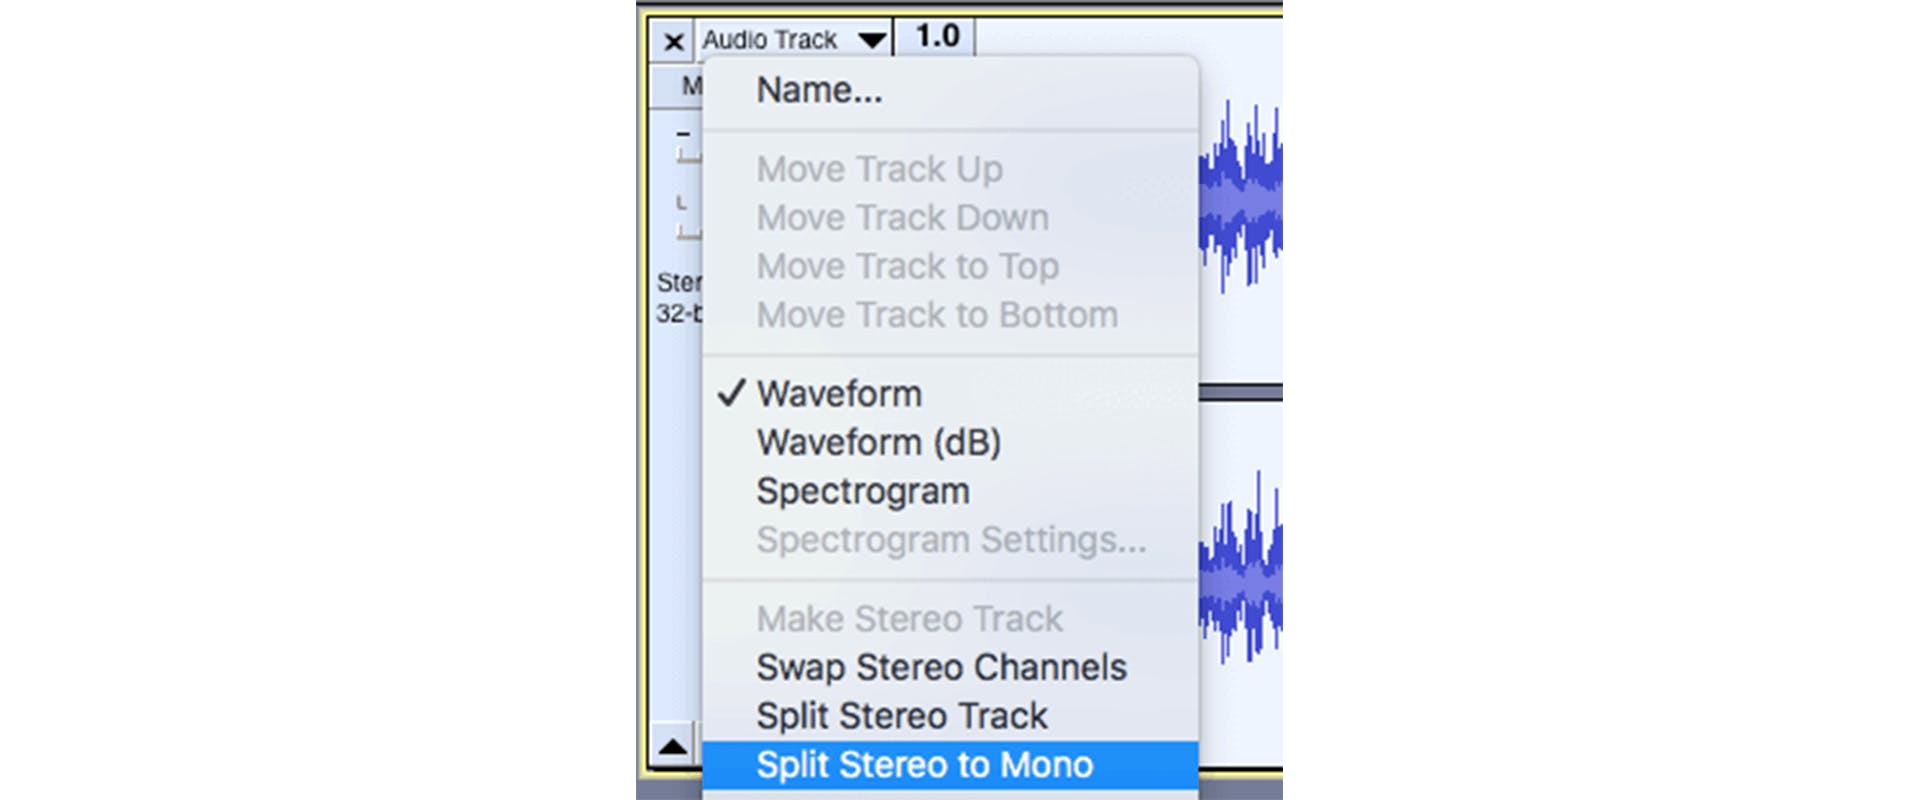
Alternatively, you can leave the two channels linked as a stereo file through the editing process and split to mono once finished. If you need to maintain the timing relationship between the two channels, this can make the job simpler by eliminating the need to make cuts & timing adjustments to multiple tracks at once.
Multiple Tracks
When using an interface/mixer with more than two inputs, such as the Rodecaster Pro, you'll need to change your Recording Device and Recording Channels selections. By default, Audacity will assign a stereo mix from the Rodecaster Pro to channels 1/2, so you'll need to add additional channels for each input. Channel 3 will correspond to Mic 1, Channel 4 to Mic 2, and so on.
Pro Tip: Whenever possible, try to record each person onto a separate track. This gives you more flexibility when you start editing your audio files.
Editing
With your recording complete, it's time to edit your podcast. In addition to any audio you recorded into Audacity, you can also drag and drop additional audio files into the workspace for use in the edit (intro/outro music, sound effects, etc.). Each will automatically be assigned its own track.
If you recorded in another free audio recording platform like Zoom, you can import those files into Audacity to begin editing.
Remember the Tools toolbar up top? Let's check it out now.
Selection Tool
The Selection Tool works much like the cursor in a word processor. You can use it to set the playback start point or select segments of audio for processing.
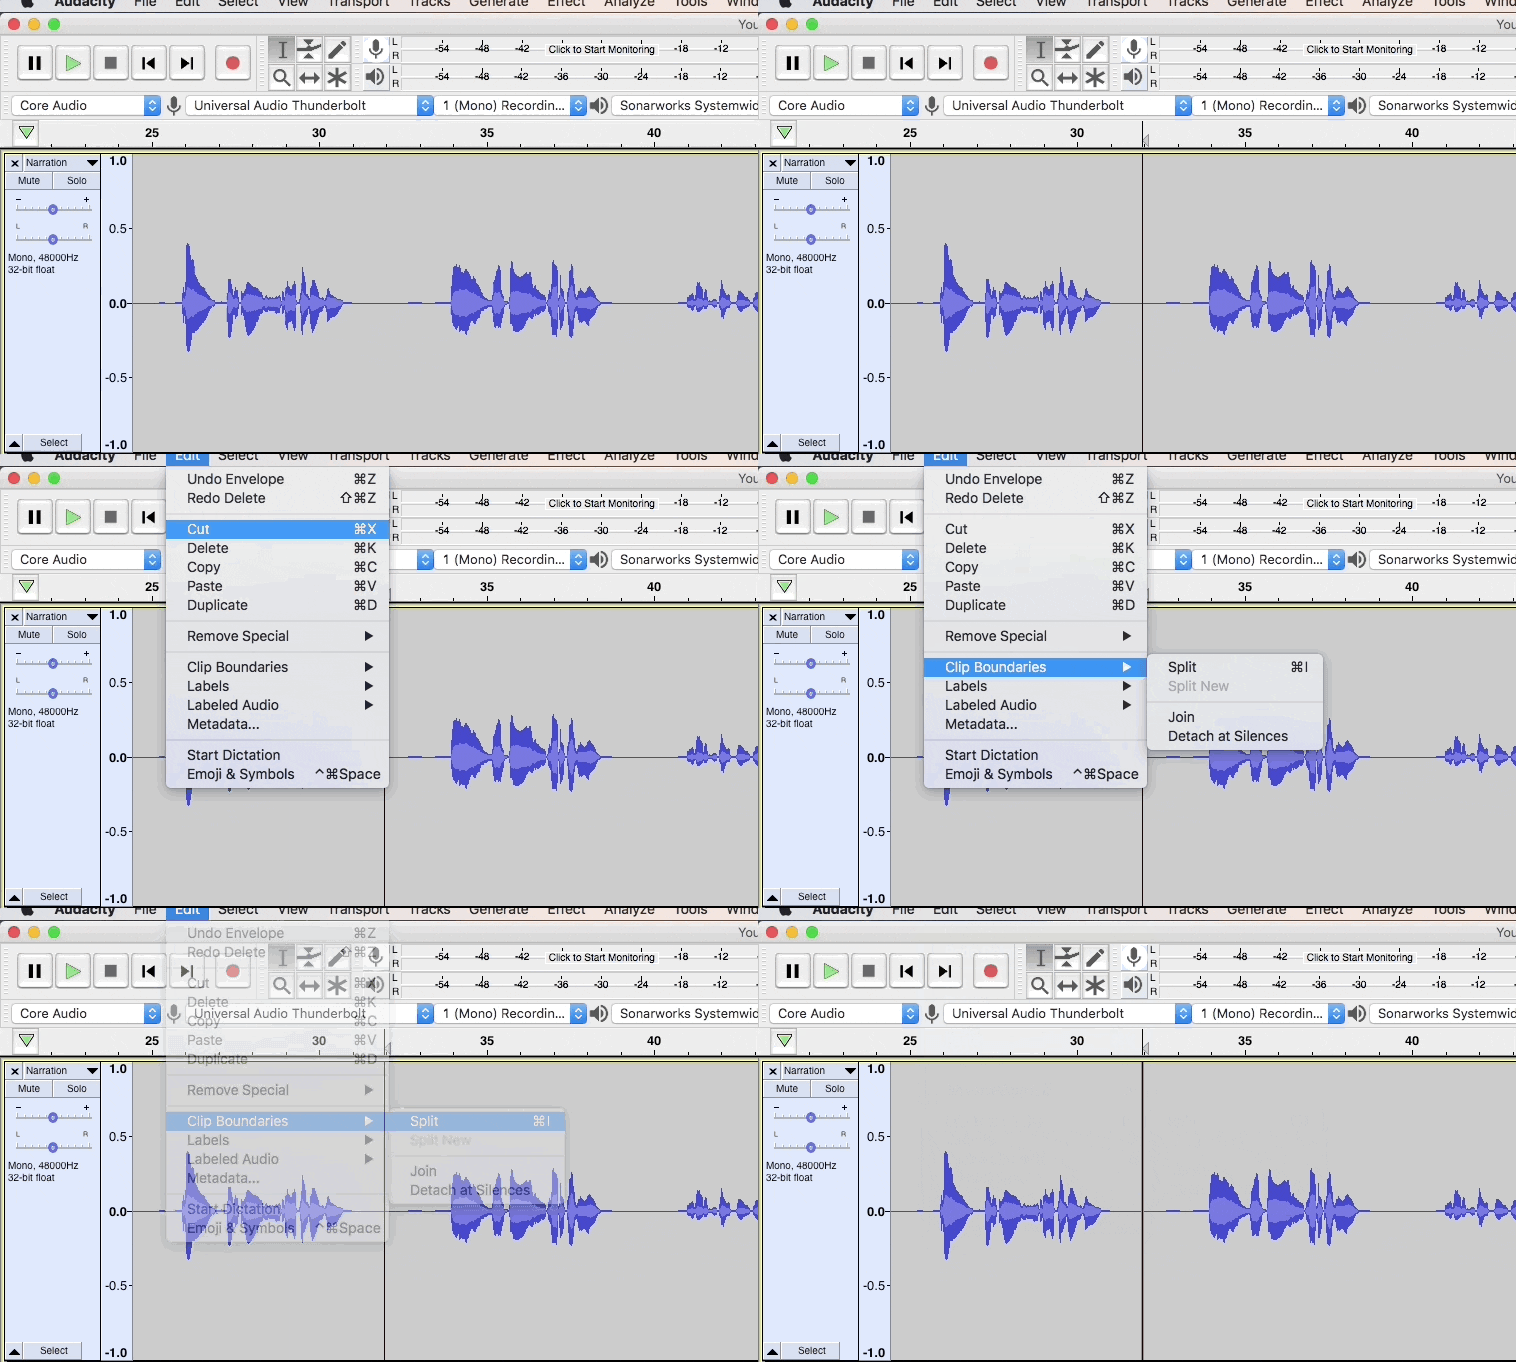
For example, if you want to cut and paste or delete a portion of an audio clip, you can highlight it and use your keyboard "cut" command or press the delete key. Notice that when you do, Audacity automatically closes the resulting gap by moving the new clip boundaries together.

Alternatively, to leave timing intact you can use the Split Cut or Split Delete functions – see Edit > Remove Special > Split Cut / Split Delete.
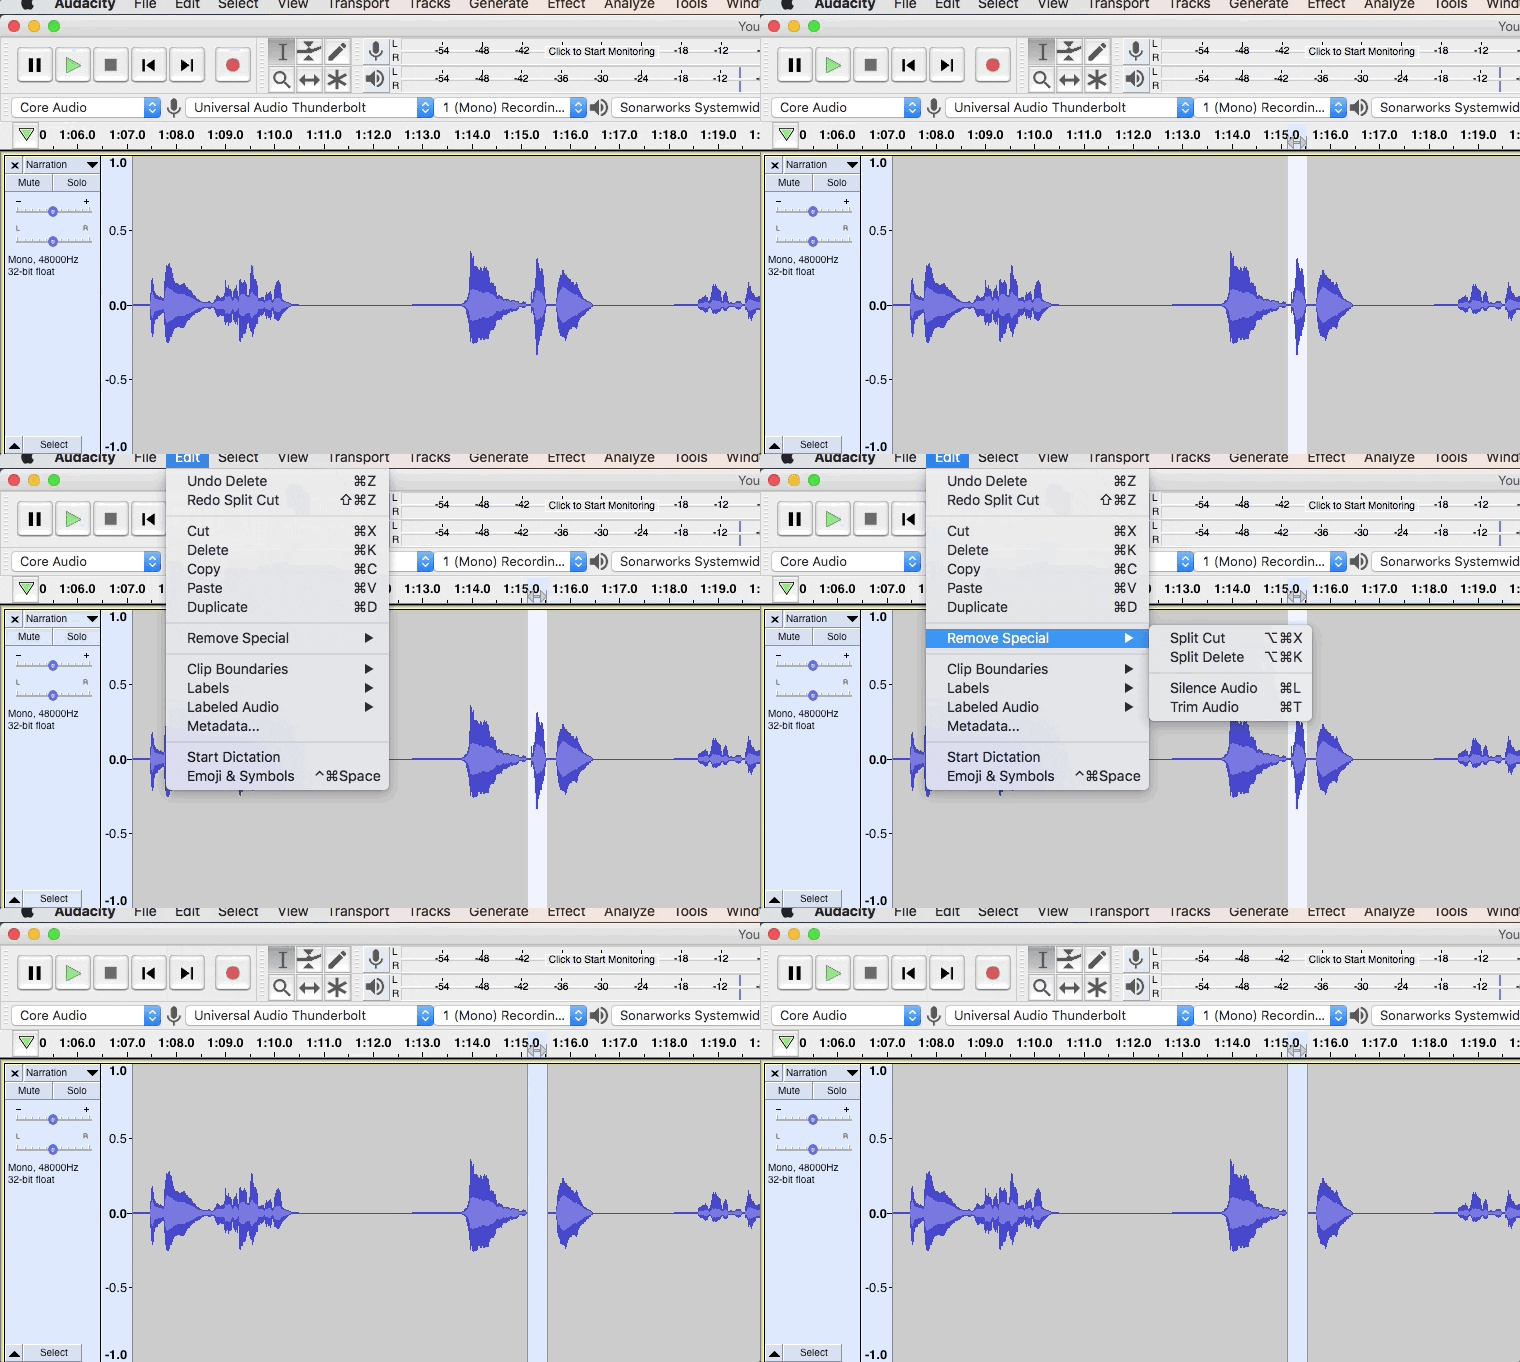
While not technically a function of the Selection Tool, a vital feature to use in conjunction with it is the Split command, located under Edit > Clip Boundaries > Split. If you want to create two individual clips from a single clip, set the playback start point with the Selection Tool and then use Split to separate them. You can also select a segment of audio and use Split to separate your selection from the content before and after it.
Time Shift
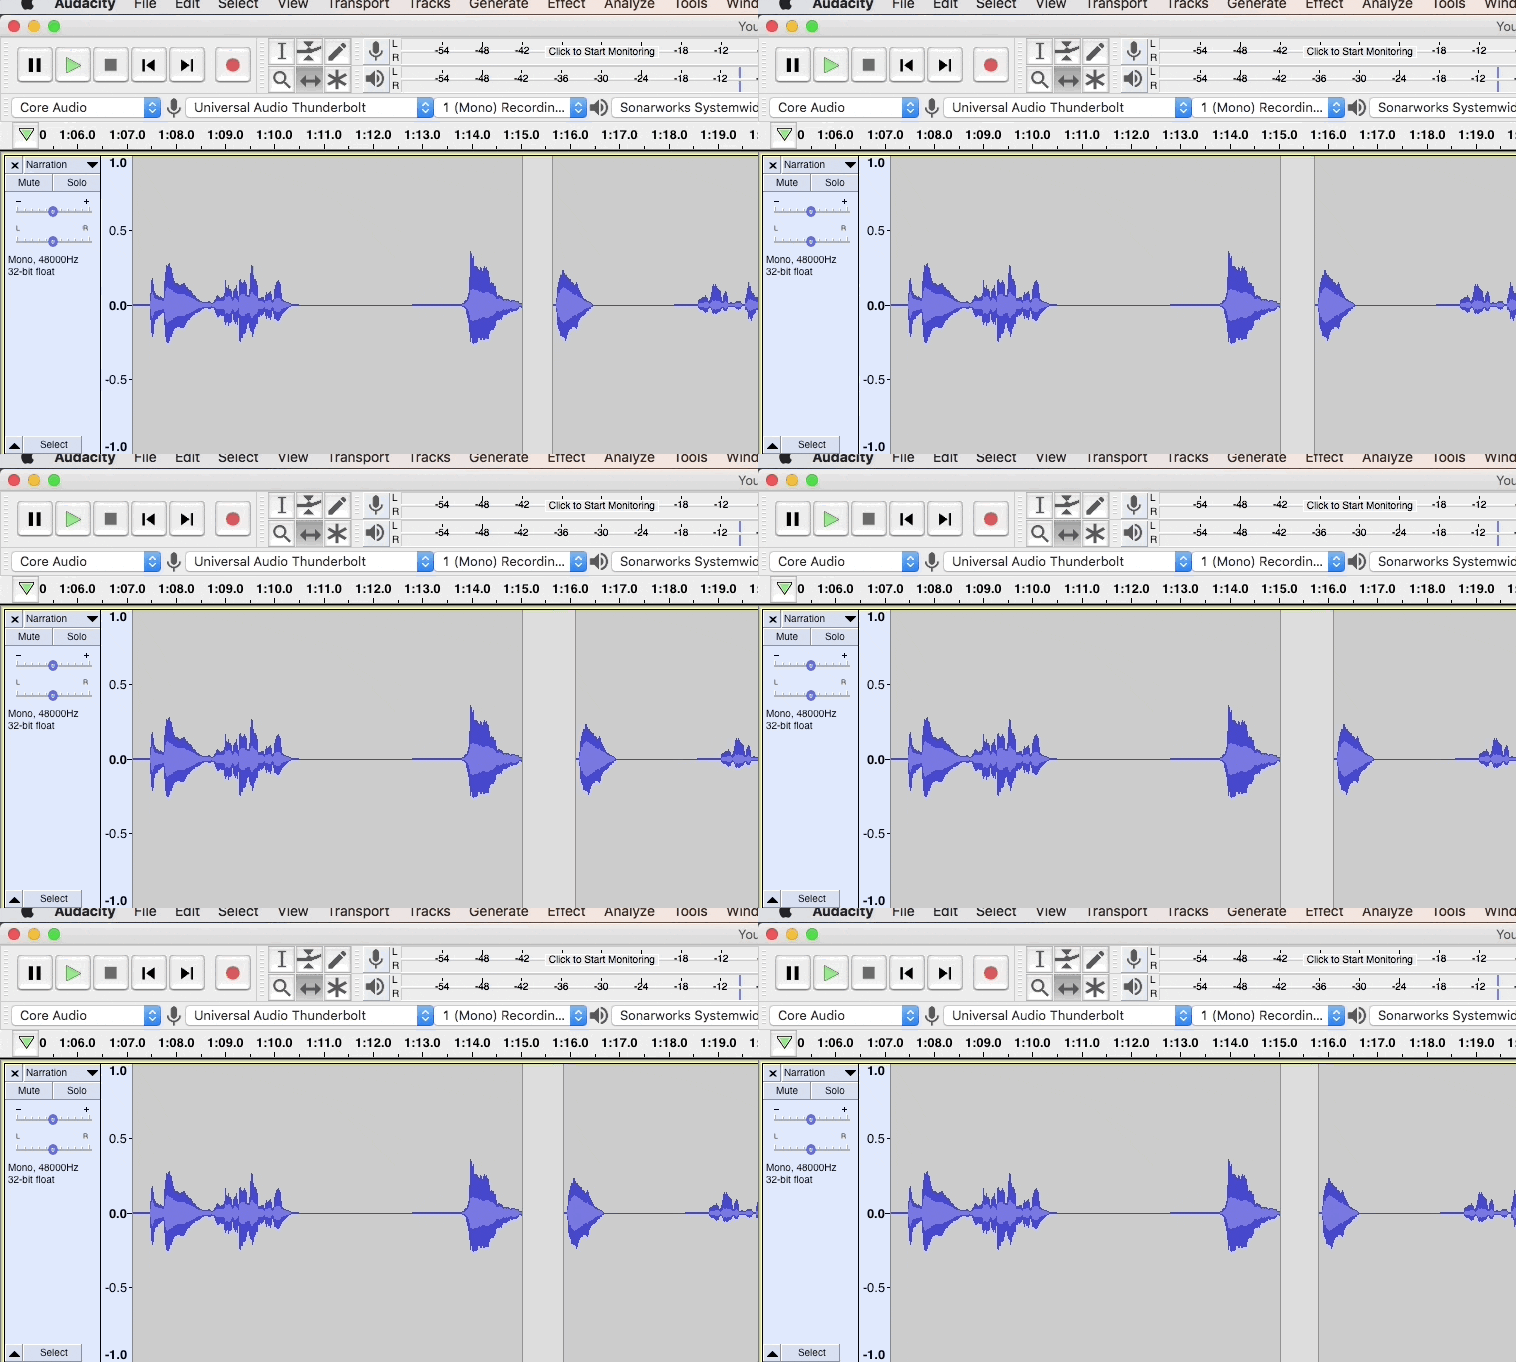
The Time Shift tool is used to move an audio clip forward or backward in time. When you'd like to change the position of an audio clip in time, select the Time Shift tool and drag it forward or backward on the track or between tracks. Note that Audacity will not let you overlap two clips on a single track.
Envelope Tool
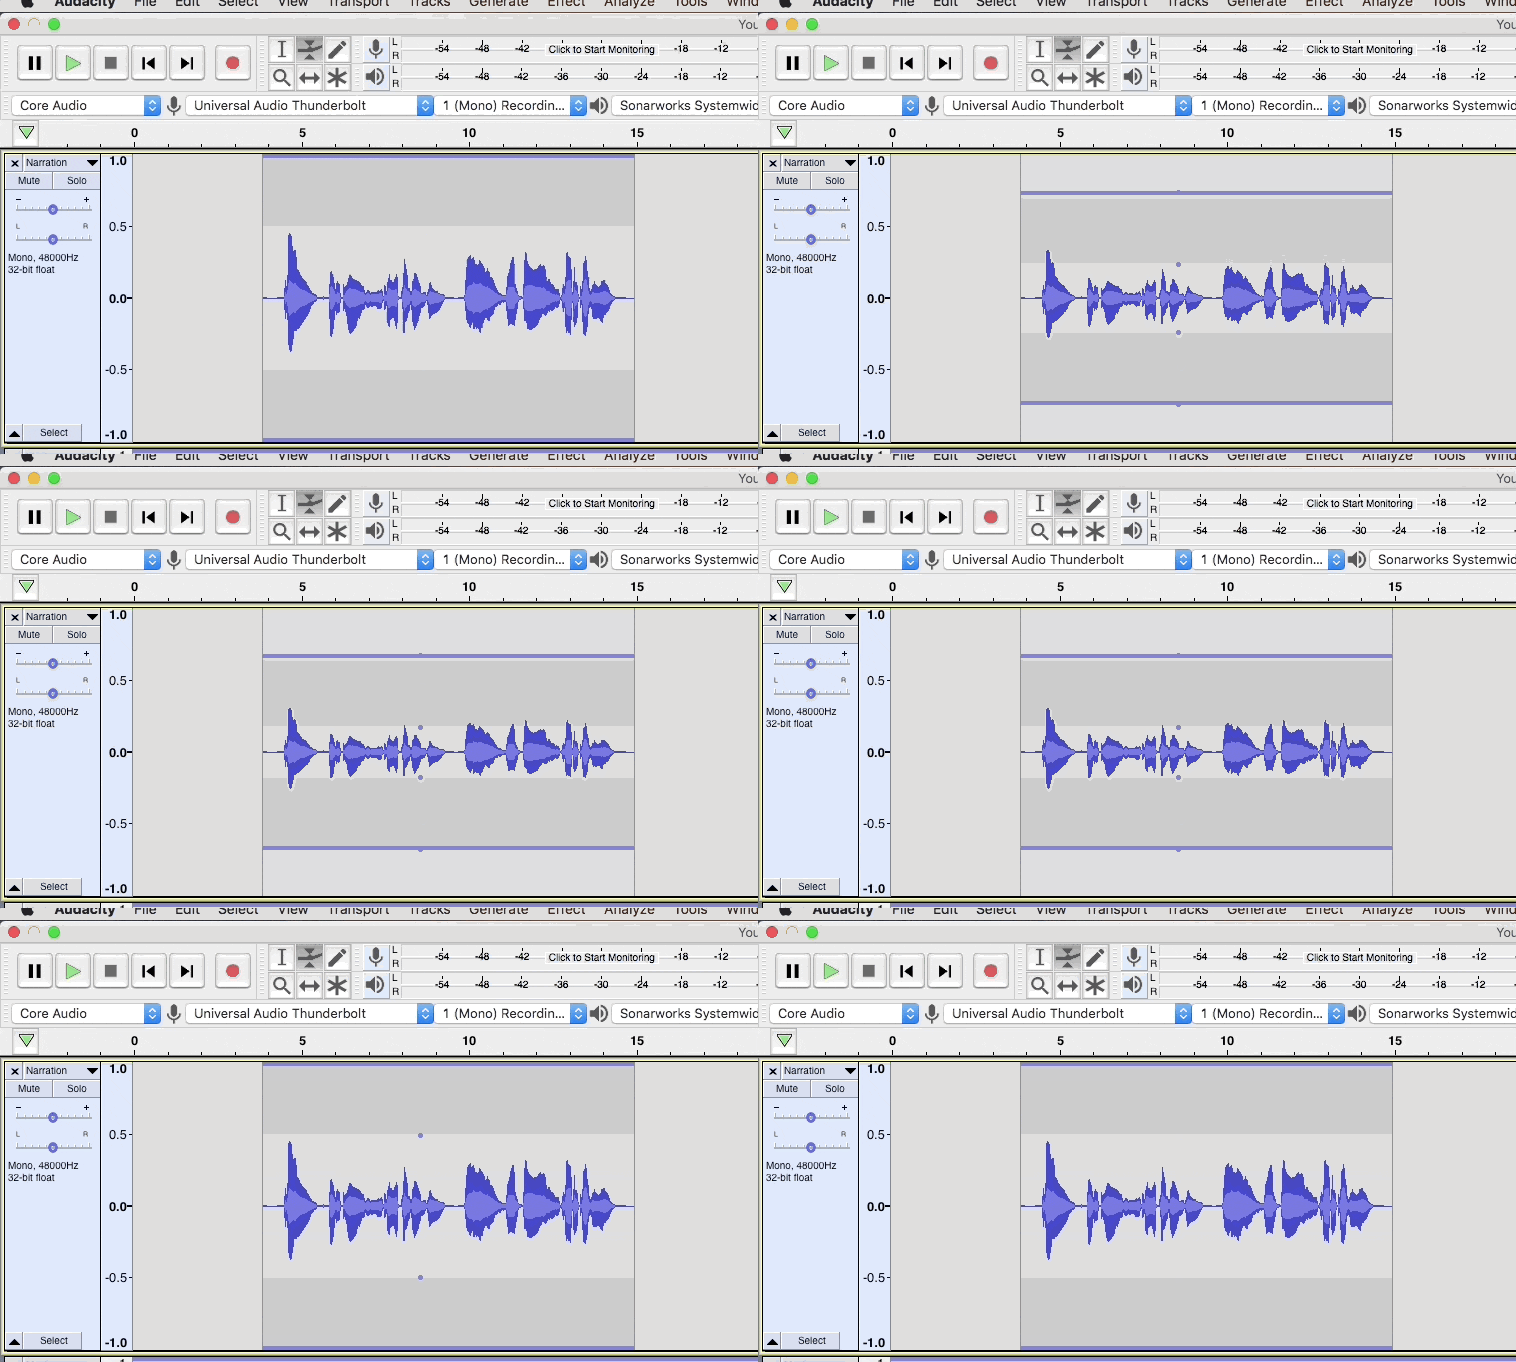
The Envelope Tool in Audacity allows you to fade in and fade out music tracks and make micro-adjustments to your audio files. When you select the tool, you'll notice gray bars appear at the top and bottom of each clip, bordered at the edges by a purple line. Click and drag up or down to adjust the gain of the entire audio clip.
Note: this is distinct from the gain slider on the track. Think of it as a "pre-gain" adjustment for getting your clip to a good working level before you make balance adjustments among tracks with their gain sliders.
A single click of the Envelope Tool on an audio clip will create a control point. To remove a control point, click and drag it off of the audio clip.
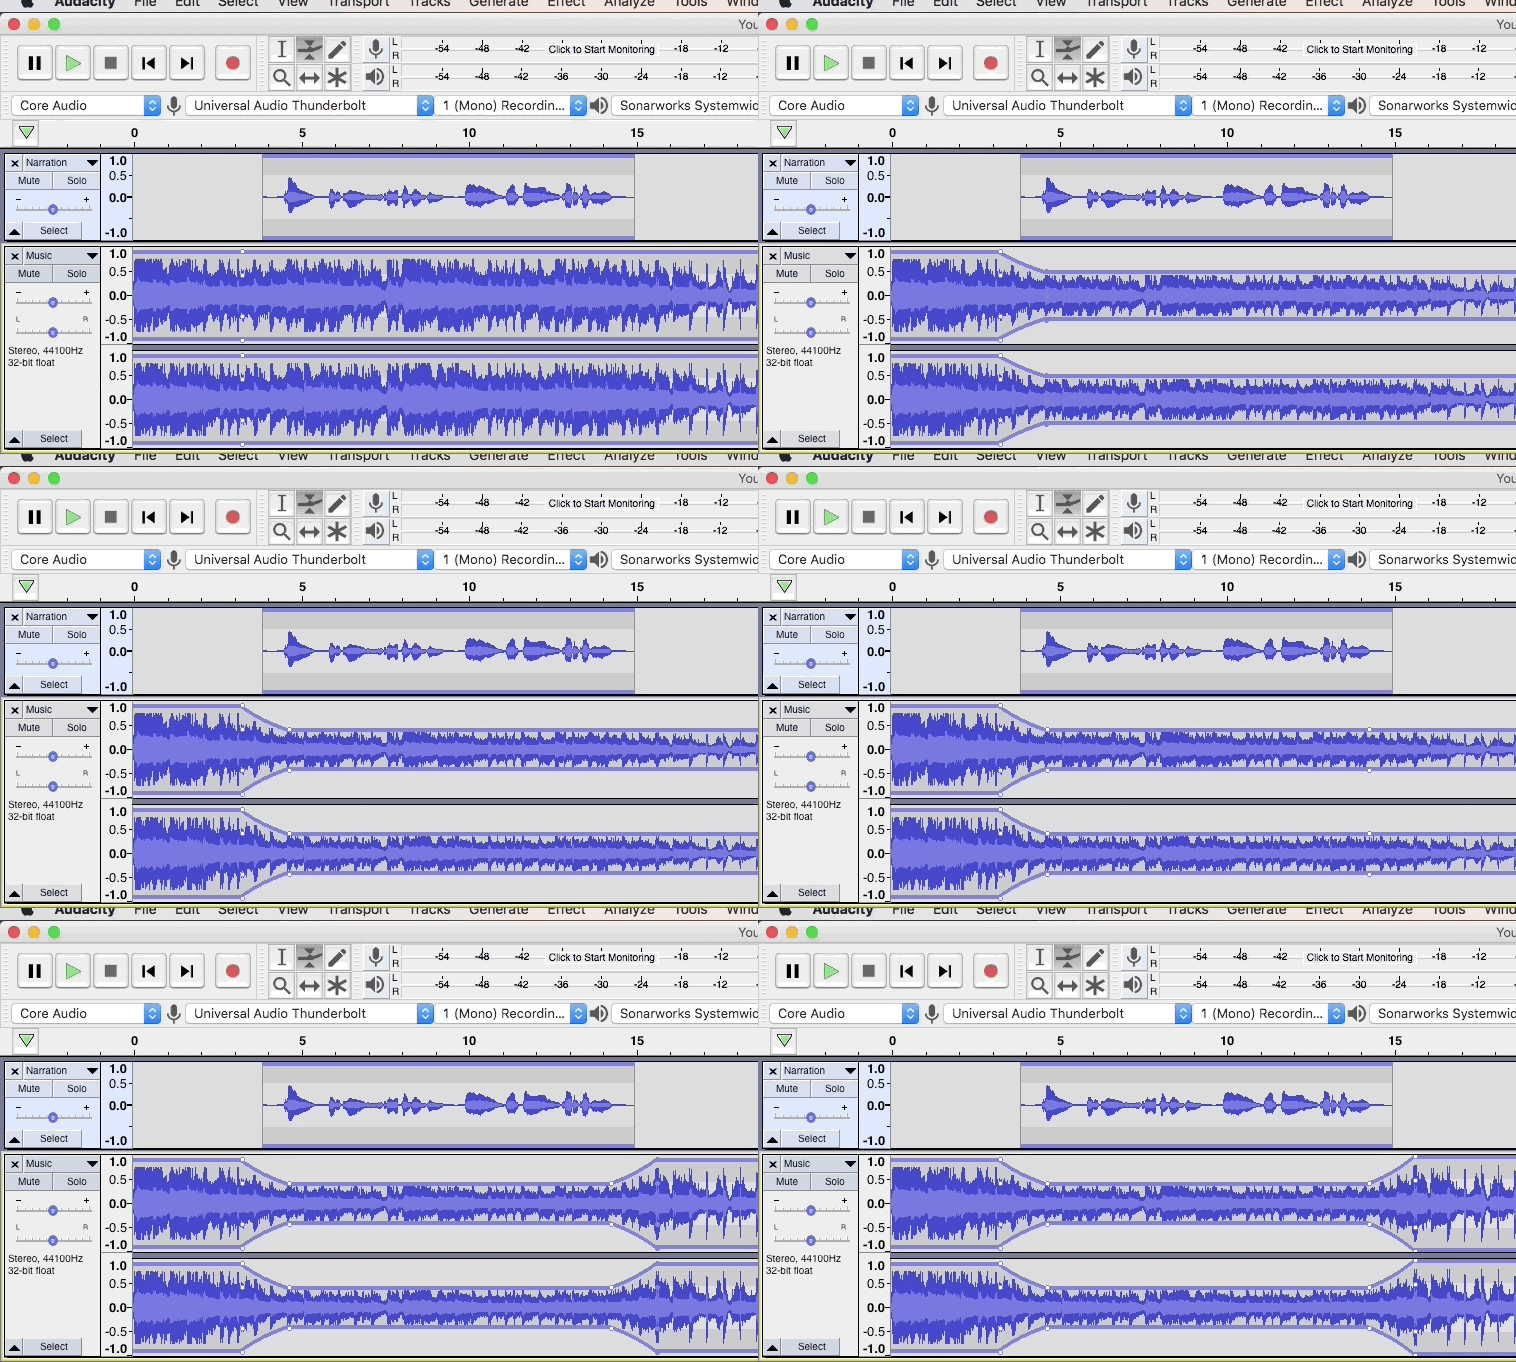
Using multiple control points, you can create gain changes across your clip, ranging from simple fades to complex dips and rises. A use case might be letting your intro music come in at full volume, then dipping it below some intro narration, making it come back up for a few seconds, and finally fading out entirely.
Podcast Episode Structure
Once you've edited your recorded and imported content to your liking, you'll need to arrange and mix your audio tracks into a cohesive episode. There is no uniform way to do this, but it's generally a best practice not to put multiple types of audio on the same track. Music, sound effects, and each voice, for example, should be kept on their own tracks.
One structure option to get you started is to arrange your tracks chronologically, beginning at the top. In this example, we have an intro clip taken from the interview that opens the episode, followed by theme music on a track just below, then the interview itself, and so on. This affords a level of visual organization, with audio cascading from top left to bottom right.

Another option is to use one track per audio source, which will minimize the number of tracks required and save vertical real estate in your workspace. In this setup, the intro clip would be on the same track as the interview, since they're from the same source. Intro and outro narration would be on one track, assuming they were taken from the same recording. Intro and outro music could potentially be on the same track if you're not using different processing on them.

Export
Once you're pleased with your edit, the last step is to export it as a single file for upload to your podcast host for distribution. We recommend exporting in a WAV file format to maintain a high level of audio quality throughout your process, then letting your podcast host transcode it to MP3 for you. In Audacity this is as simple as reaching for File > Export > Export as WAV.
A dialog will open where you can name your file, choose a destination for it, and select your WAV bit depth or choose an alternative format (AIFF, MP3, etc.) if you desire. Click 'Save.'
Audacity will alert you that your tracks will be mixed down and exported to two stereo channels (if your session includes any stereo tracks) or one mono channel (if your session includes only mono tracks). The subsequent dialog will allow you to embed metadata into the file if you choose, but this is not necessary if your podcast host handles metadata for you like Buzzsprout does. If you prefer to ignore either warning in the future, click the box that reads "Don't show this when exporting audio." Click 'Okay,' and Audacity will export your file.
Voila! You now know how to use Audacity to edit podcast episodes.
Auphonic
A final recommendation that we make is to take advantage of Auphonic's podcast mastering features. Using Auphonic as the final step in your workflow lets you optimize your audio for podcast directories like Apple Podcasts (formerly iTunes) and Spotify.
To learn how to use Auphonic, be sure to check out our complete guide and video tutorial. Once you have your mastered file in hand, upload it to your podcast host – and get to work on your next episode!
More Audacity tutorials
Audacity is an excellent open-source, audio editing tool that is widely used by digital audio creators. These tutorials can help you get more comfortable, so you can use Audacity to confidently edit your own podcast!